Cycle Counts
The Cycle Counts section allows users to perform Cycle Counts and Physical Inventory Counts in order to verify the existence of Inventory Tags. Both Counts can be performed on one Item multiple Items, Item Types (Finished/WIP/Purchased), all Items, all Item Types, one Location, multiple Locations, or all Locations. Multiple Cycle Counts can be Active at the same time for different Items, Item Types, and/or Locations but the same Item may not be included in more than one Cycle Count and you cannot do a Cycle Count by Item and by Locations at the same time.
When a Cycle Count is started, each Serial Number that is scanned, is tracked so that non-existent Serial Numbers can be identified. Reports can be used to identify Serial Numbers that are not scanned by the Cycle Count.
The Cycle Counts section can also be used to enter in existing, previously unscanned Inventory into the system.
Once a Cycle Count is completed, the system will adjust the Production and Tag Inventory numbers to match (both Good and/or Held), and will automatically delete all un-scanned Tags from the system. Inventory at a Processor is left untouched by the Cycle Count since there is no way to scan the Tags at the Processor Location.
Note
Use can create new Barcode Labels before and during a Cycle Count to be include in the Cycle Count if you come across materials that doe not have a Tag on them. Users can use the ShopEdge Android Application or the Windows CE Application to create new Tags. This is useful to create Tags for unidentified Inventory, or to initialize Cycle Counts on system startup.
To view Cycle Counts in the system, navigate to the  tab and click on the
 ![]() icon.
The Cycle Counts screen will be displayed.
icon.
The Cycle Counts screen will be displayed.
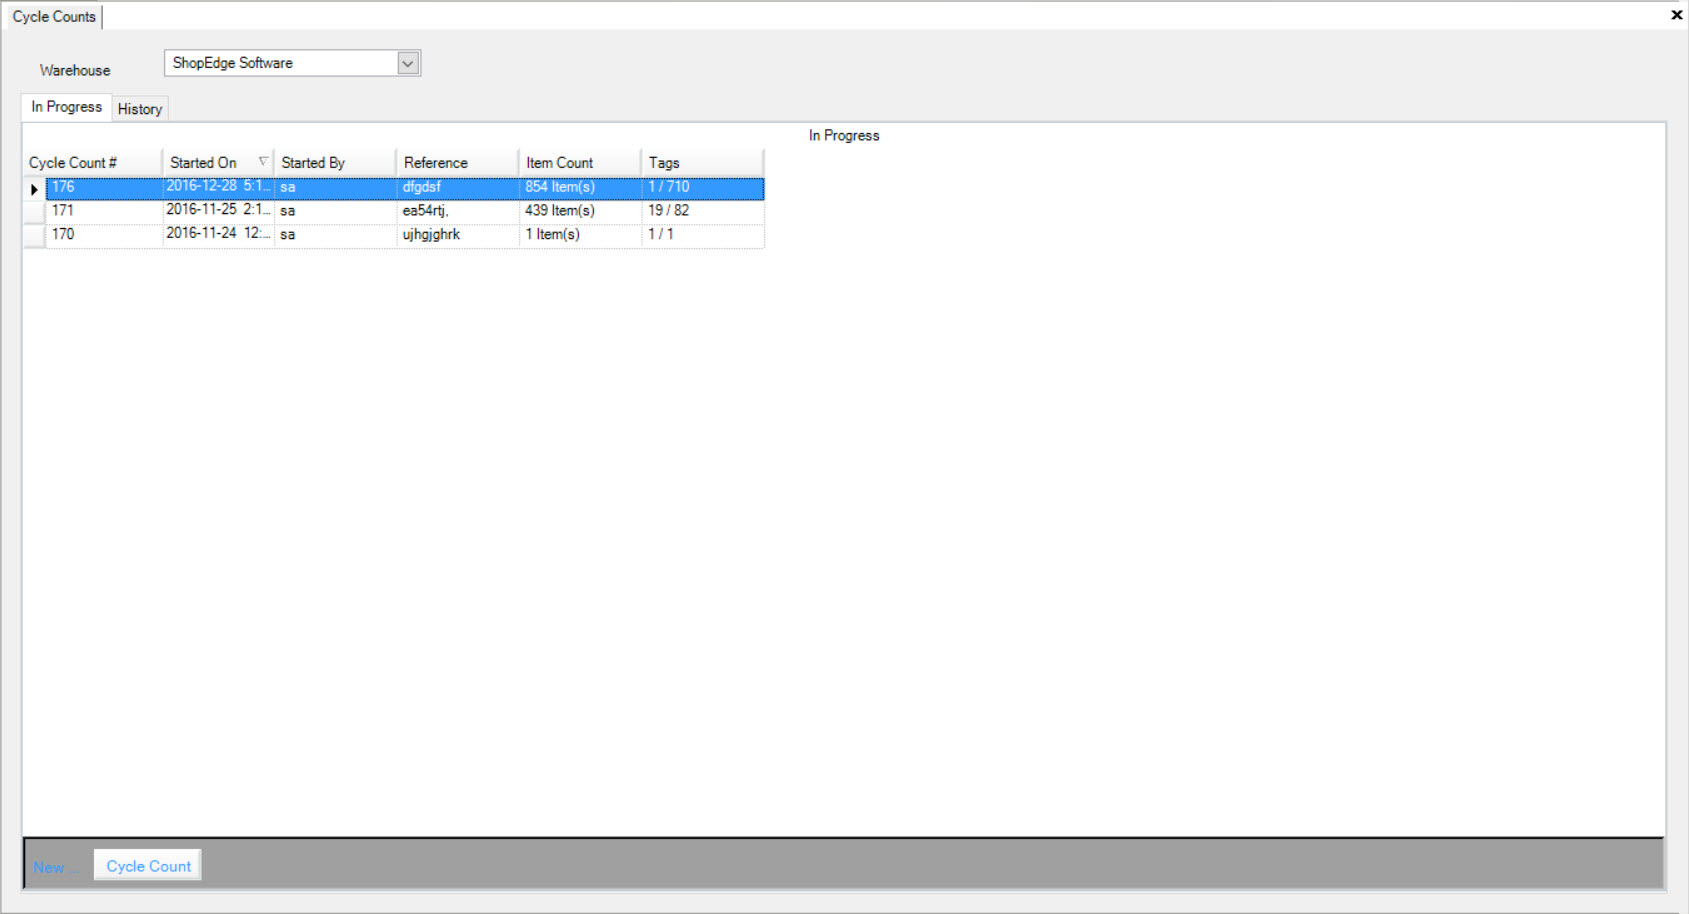
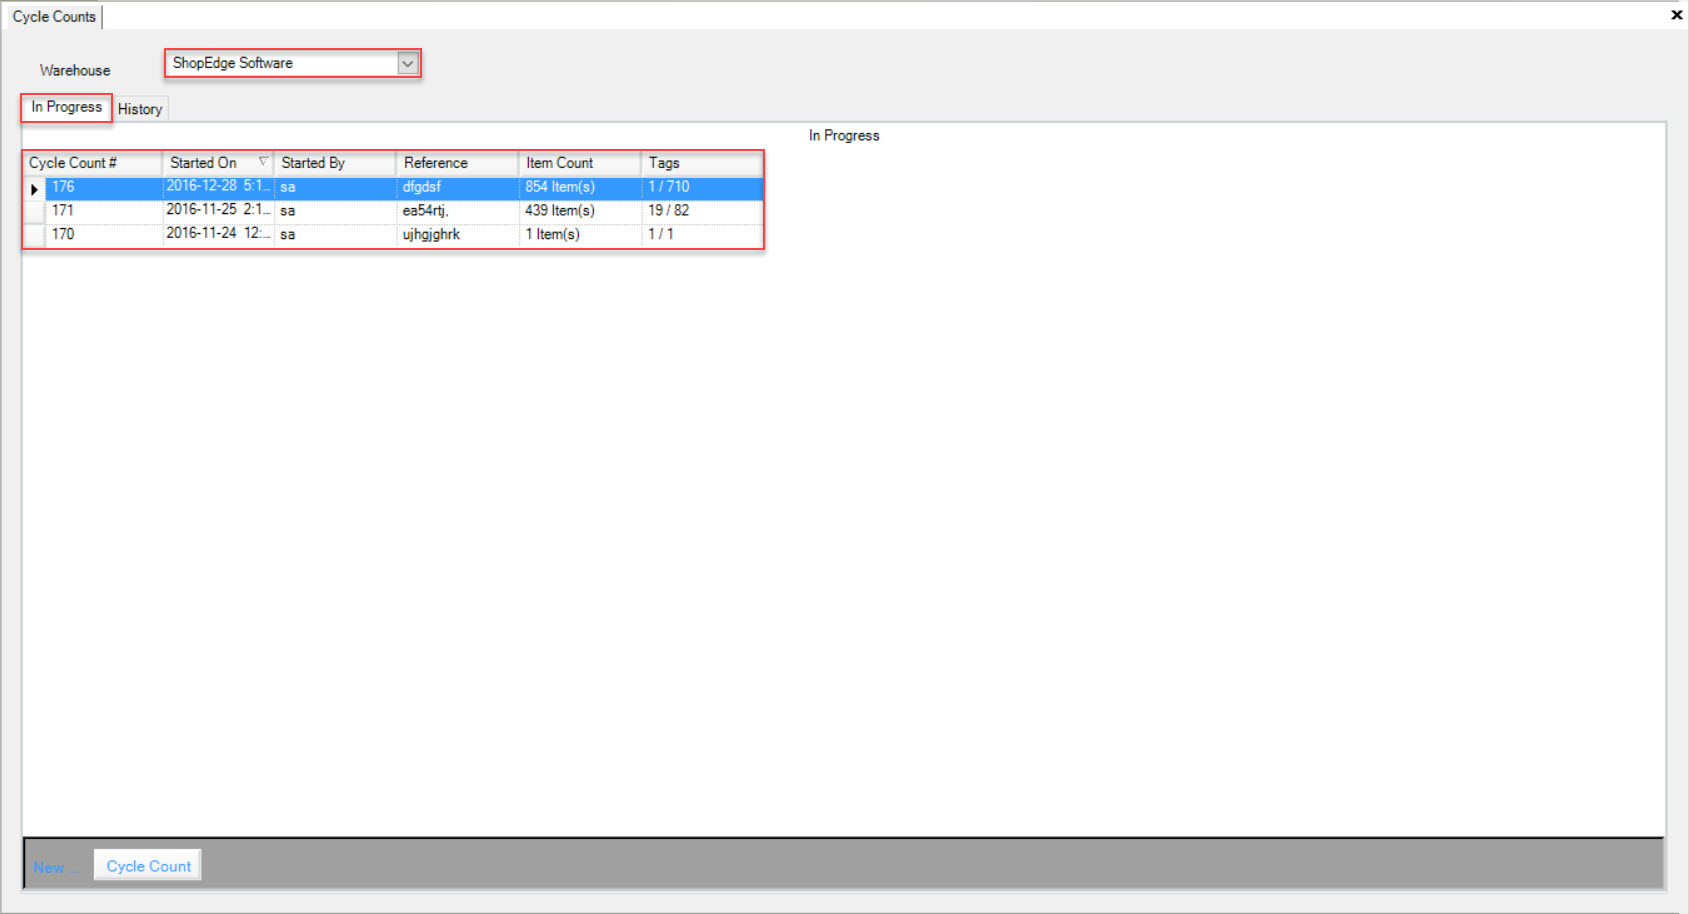
If applicable, users are able to select a Warehouse using the available drop-down menu. Then, click on the  tab to view the Cycle Counts
that are In Progress. The system will populate them according to the Warehouse selected.
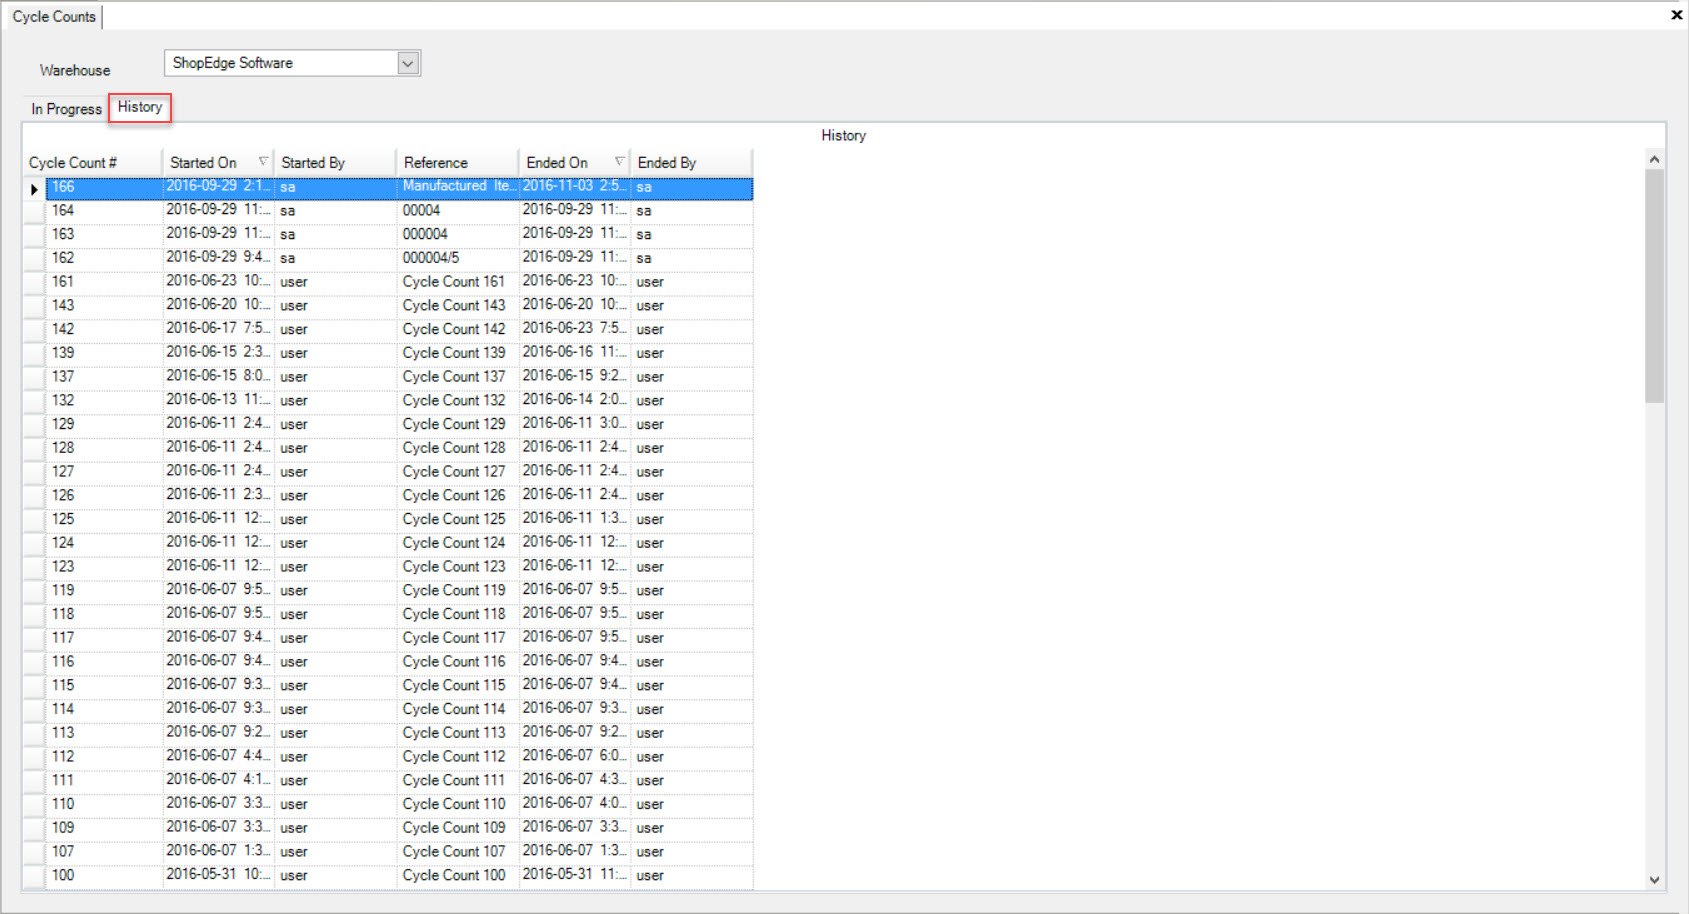
If users wish to view the Cycle Count History, simply click on the  tab. Users will be able to view the Cycle Count #, Started
On date, Started By, Reference, Ended On date, and Ended By for each available Cycle Count that has been previously done.
Starting a Cycle Count by Item
In order to keep track of Inventory scanned during a Cycle Count, users must start the Cycle Count in the system. Starting a Cycle Count will allow ShopEdge to take a snapshot of the current Inventory (both Good and Held), for the Items and/or Locations selected. The system will take a snapshot of all Tags matching the Items and/or Locations selected so it can track the ones that have been scanned. This snapshot is then used to compare before and after Inventory. Also, once a Cycle Count is started, the system will begin to record each Serial Number that is scanned as part of the Inventory. Both Good and/or Held Serial Numbers need to be scanned as part of the Inventory.
To start a Cycle Count by Item, navigate to the  tab and click on the
 ![]() icon.
The Cycle Counts screen will be displayed.
icon.
The Cycle Counts screen will be displayed.

Click on the  button located at the bottom of the screen.
The Start Cycle Count window will appear. To start a Cycle Count by Items, users must select Items at the top of the window.
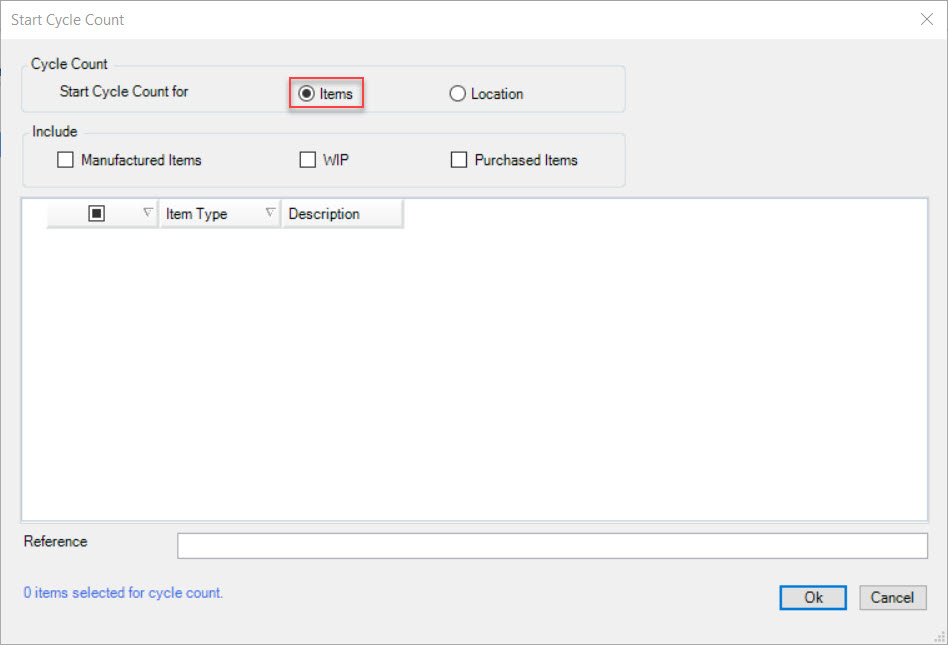
Users then have the option to include Manufactured Items, WIP, and/or Purchased Items. Simply select the checkboxes that you wish to include in the Cycle Count.
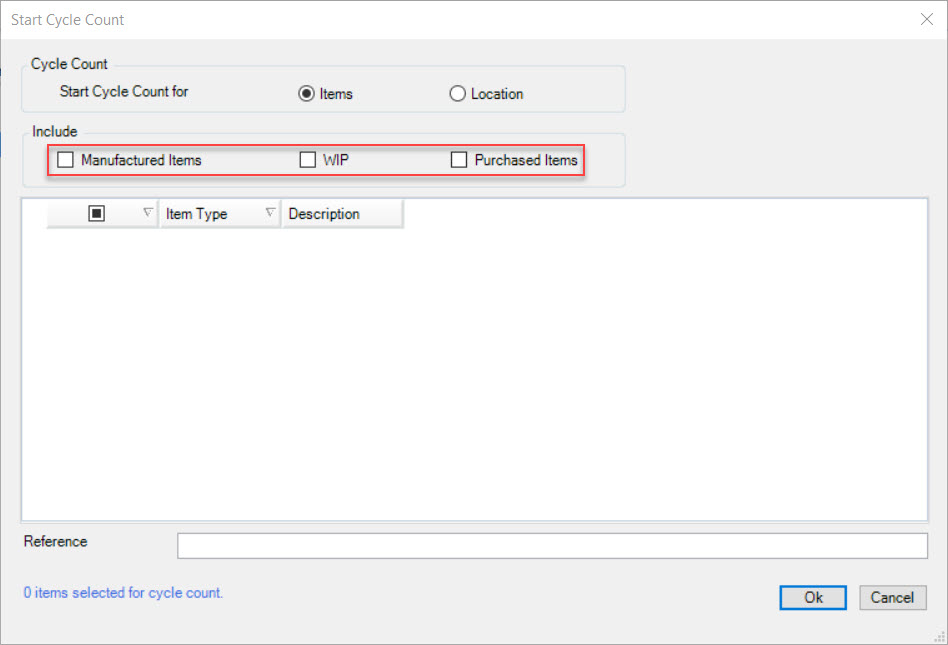
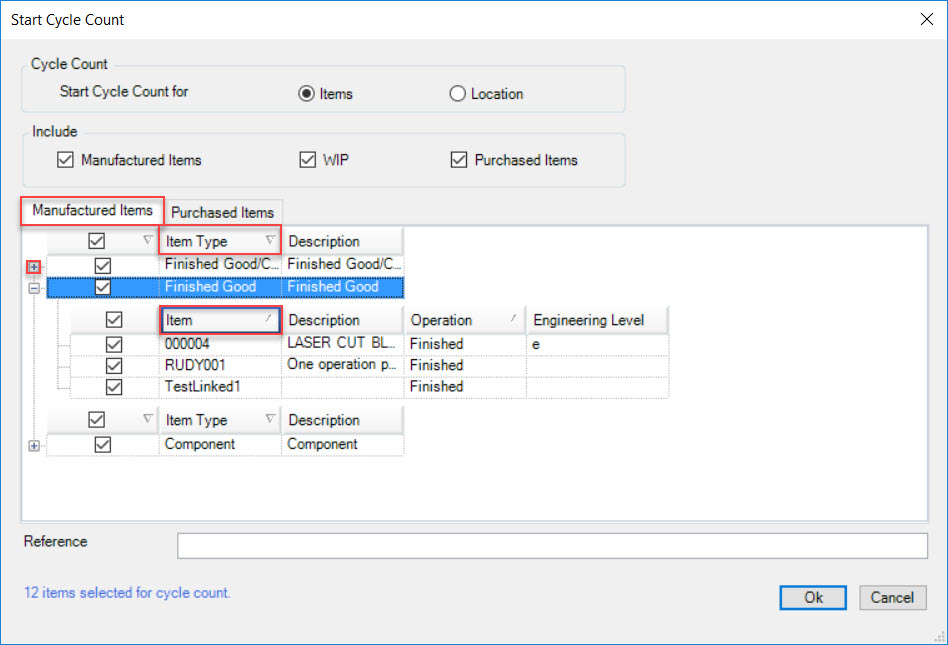
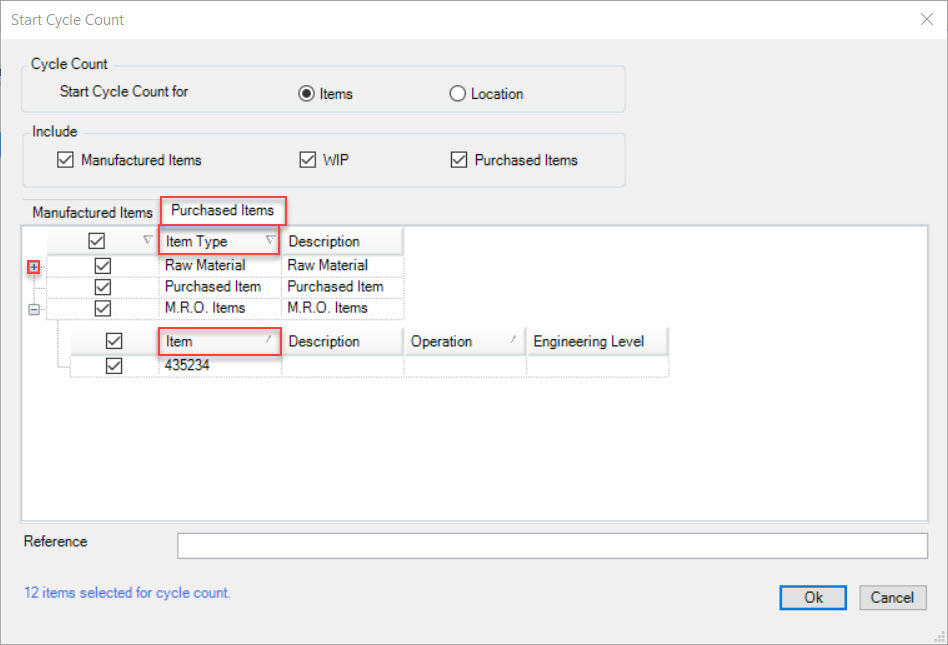
Once they have been selected, the system will populate them in the table below. Users have the option to select or de-select Item Types both under the  tab and the
  tab. Items can also be selected or de-selected by clicking on the plus sign button located beside the Item Type row on both tabs.
Note
Purchased Items will only show if the Enable Serialized Inventory/Heat Tracking box is selected on the individual Purchased Item detail screen under the Purchasing module. For more information on how to add Items to a Cycle Count after the Heat Tracking has been checked, see below under the section Add an Item or Location to a Cycle Count in Progress.
Next, users must enter in a Reference for the Cycle Count. Once the appropriate information has been completed, click on the  button.
The Cycle Count will be added to the list of Cycle Counts In Progress on the Cycle Counts screen.
Starting a Cycle Count by Location
To start a Cycle Count by Location, navigate to the  tab and click on the
 ![]() icon.
The Cycle Counts screen will be displayed.
icon.
The Cycle Counts screen will be displayed.

Click on the  button located at the bottom of the screen.
The Start Cycle Count window will appear. To start a Cycle Count by Location, users must select Location at the top of the window.
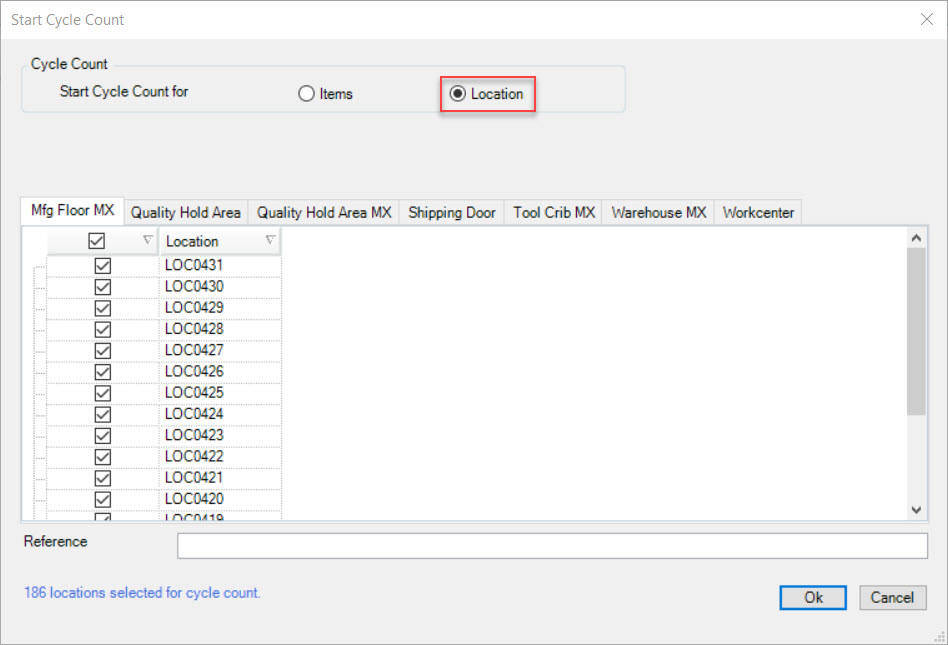
Users can then select or de-select Locations based on the Locations set up under the Tag Locations screen. Simply click on the appropriate tab and select or de-select the necessary Locations.
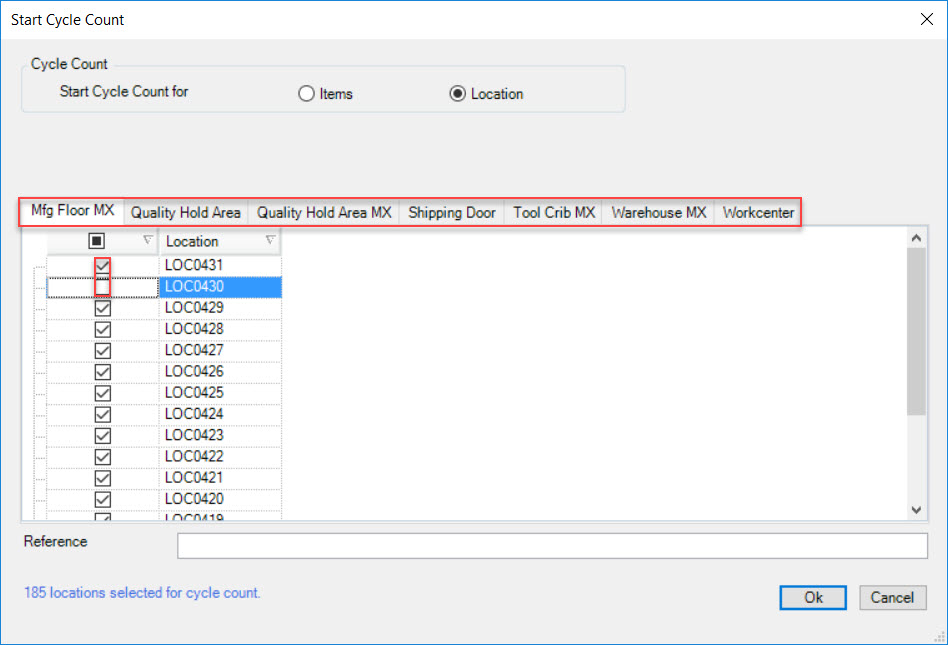
Next, users must enter in a Reference for the Cycle Count. Once the appropriate information has been completed, click on the  button.
The Cycle Count will be added to the list of Cycle Counts In Progress on the Cycle Counts screen.
Note
Users may notice a delay while the system starts a Cycle Count. The system will capture a snapshot of all current Inventory for the Items or Locations to be included as part of the Cycle Count so it can be used to compare before and after Inventory at a later time.
Note
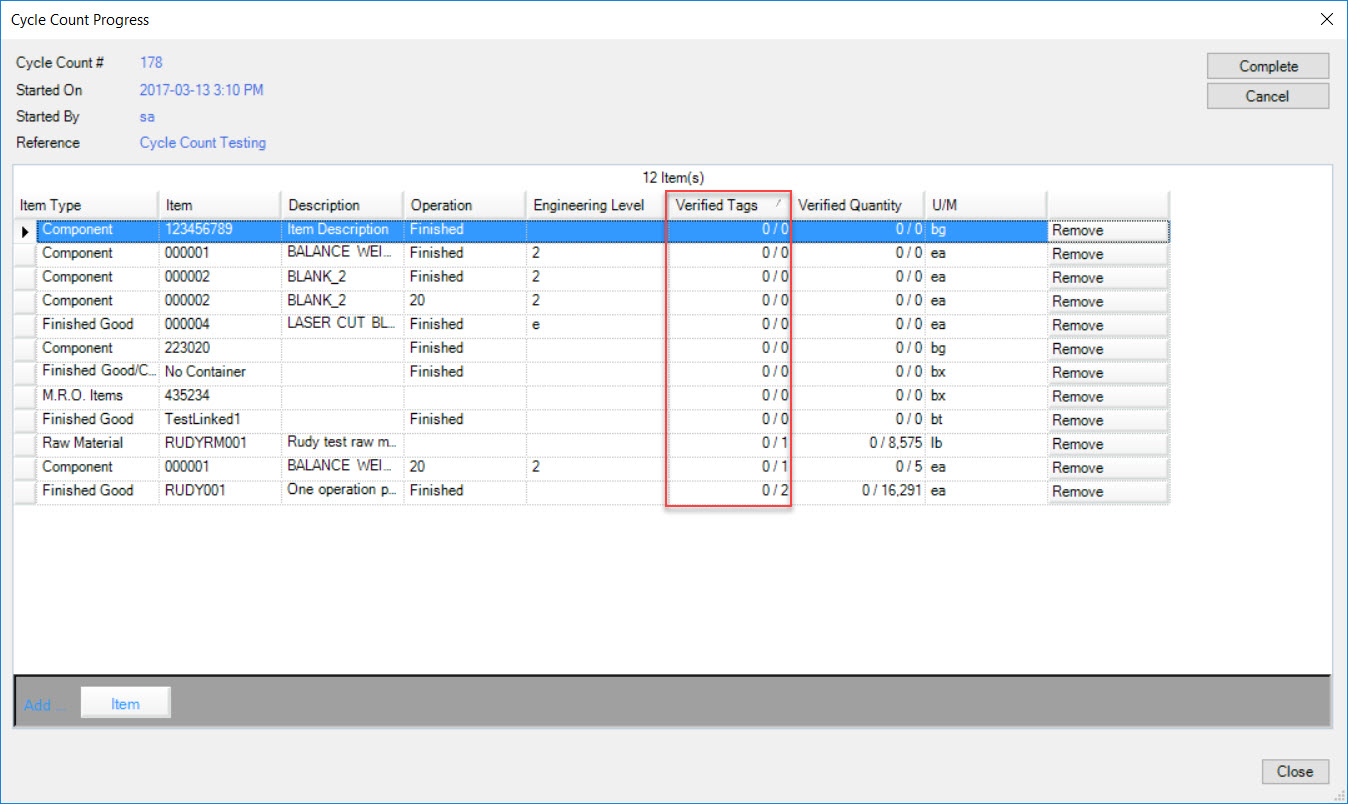
Tags must be scanned and verified using the Cycle Count function on either the ShopEdge Android Application or the Windows CE Application. If they are scanned using the normal Inventory function, they will not be verified against the Cycle Count and will be left as un-scanned. Users can confirm if Tags have been verified in the Cycle Count by double-clicking on the appropriate Cycle Count. Users may also right-click and select View from the menu.
Scanning Existing Tags
Once a Cycle Count is started, the system will track all Serial Numbers scanned during the Cycle Count process. Only Item and Location Serial Numbers pertaining to the Cycle Count, will be tracked and both Held and Good Tags must be scanned for the Items.
To verify the existence of a Serial Number for a Cycle Count, simply scan the Serial Number Barcode on the Inventory Tag label. Users can scan Serial Numbers for WIP, Finished Goods, and Raw Materials.
Note
Master Tags can also be scanned to verify Inventory.
Android Application
To start scanning existing Tags as part of the Cycle Count on the Android Application, users must find the Cycle Count for which they wish to scan Tags for.
Once the Cycle Count has been located, users must select Start Scanning from the action menu. The Scanning window will open:
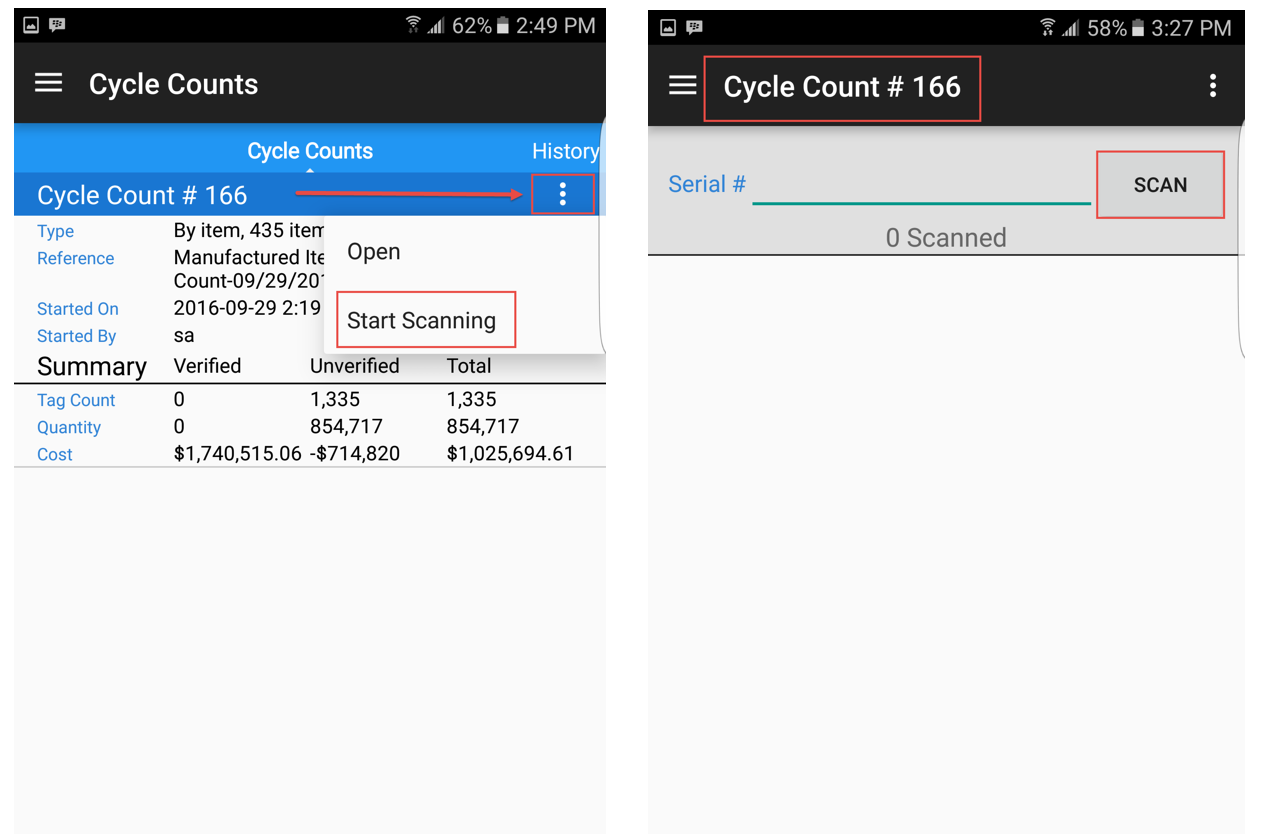
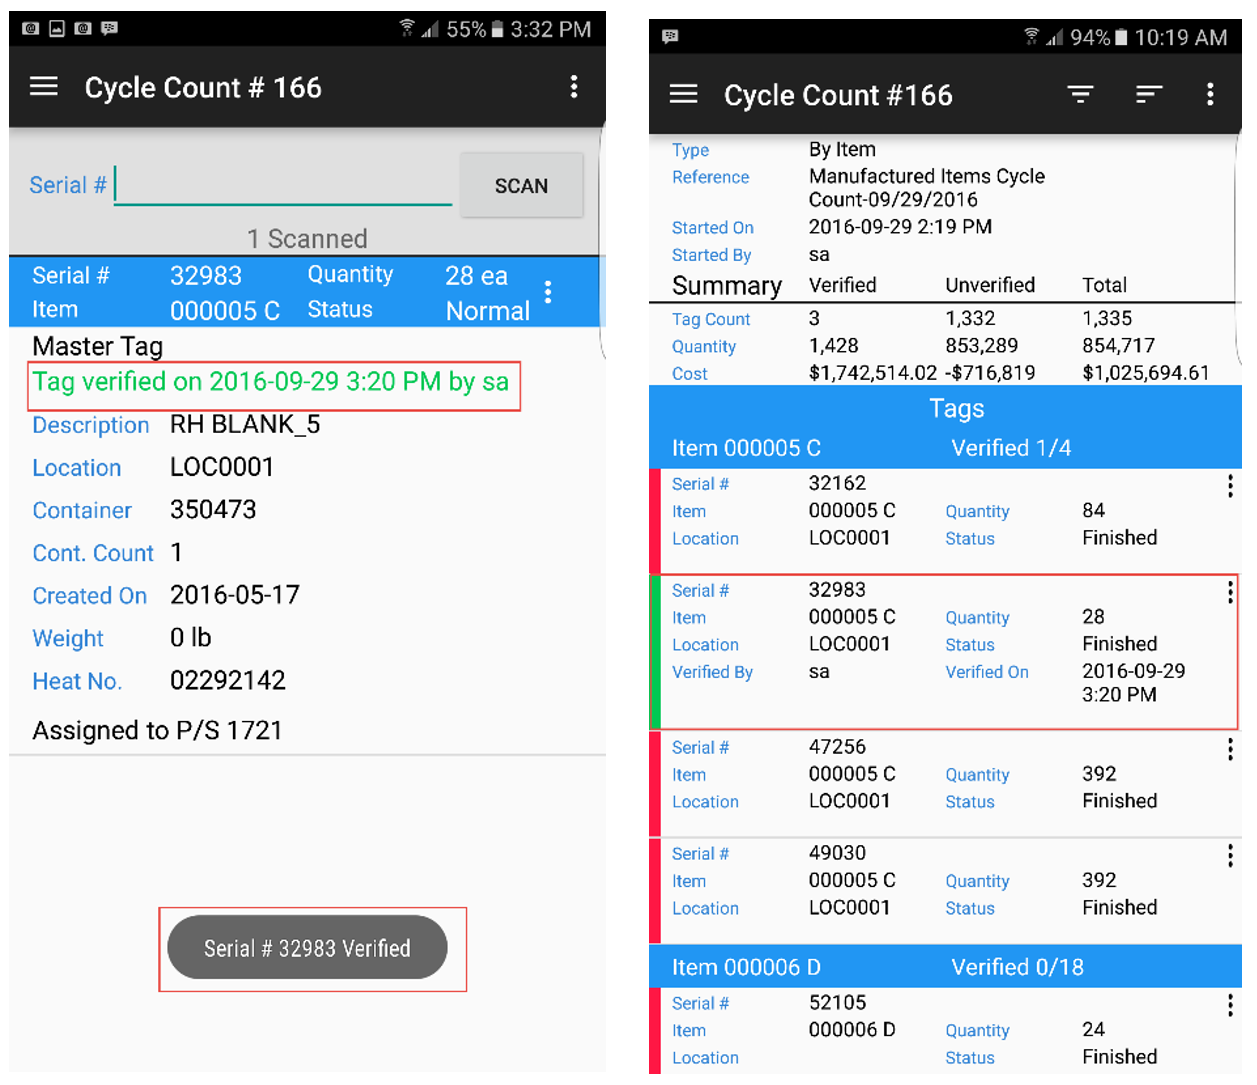
To confirm, make sure the correct Cycle Count is listed at the top of the screen. Select the Scan button or users can also manually type in the Serial Number. The system will let you know when the Serial Number has been verified, and the Tag will show as green on the Cycle Count home screen.
Fork-lift Terminal
To scan existing Tags on the Fork-lift Terminal, open the Cycle Count module on the scanner by clicking on the  button.
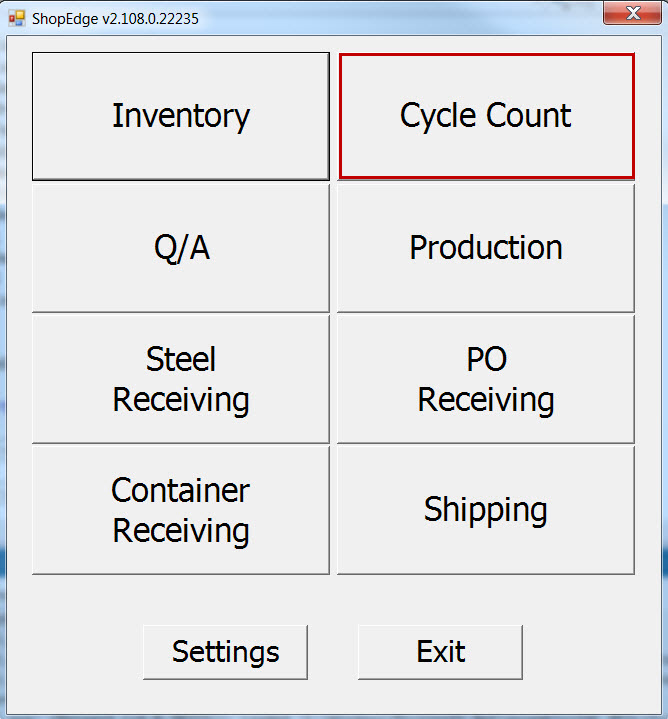
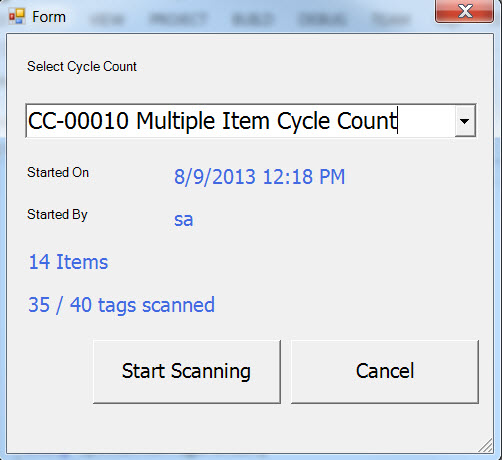
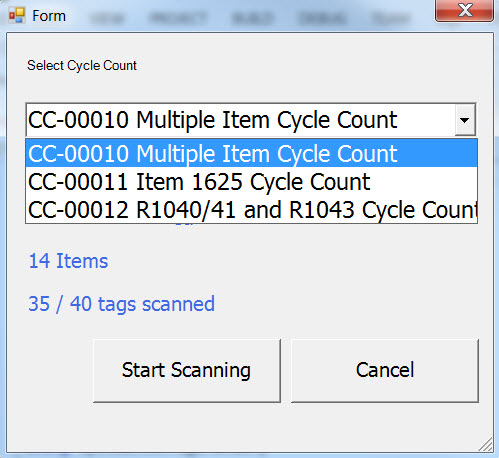
The Select Cycle Counts screen will be displayed. Users must click on the drop-down arrow to view all Cycle Counts in progress.
A Cycle Count by Item will look like this:
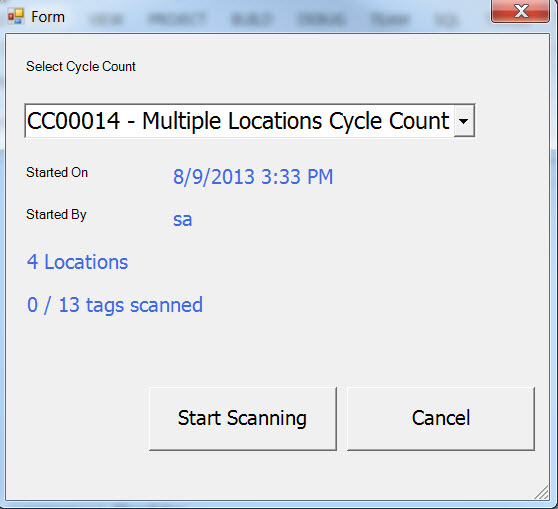
A Cycle Count by Location will look like this:
Select the Cycle Count that you wish to access and click on the  button.
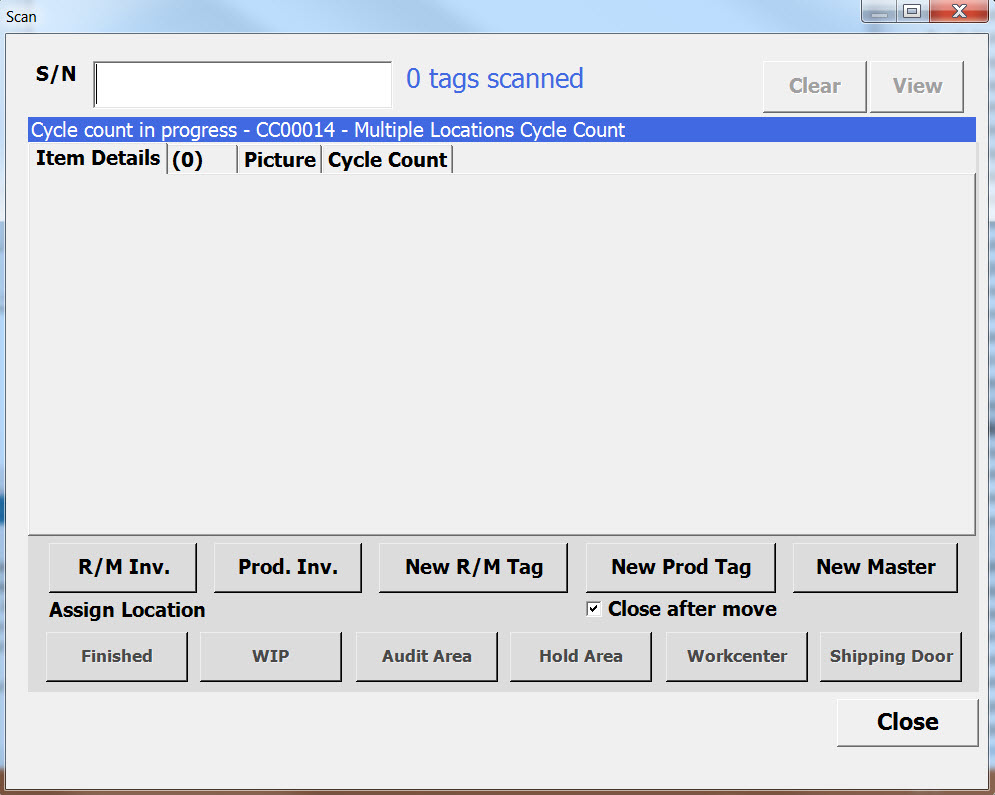
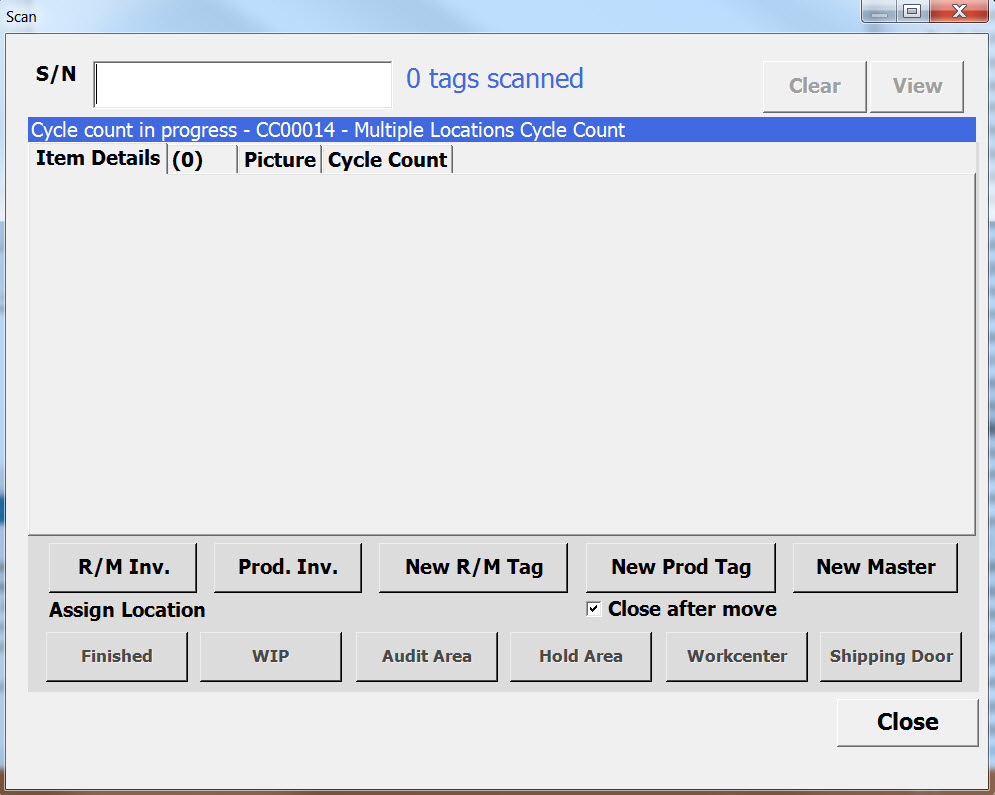
The Scan screen will be displayed. Users can begin the Cycle Count by scanning the Serial Number.
Scanning the Serial Number of a Cycle Count by Item will look like this:
Scanning the Serial Number of a Cycle Count by Location will look like this:
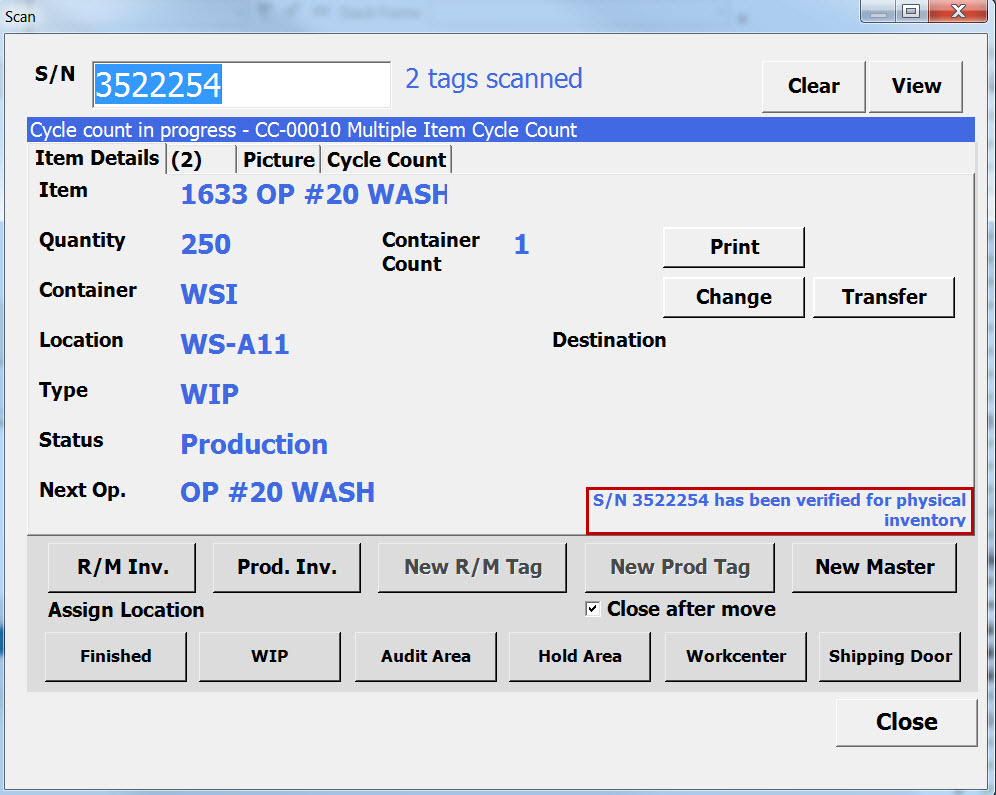
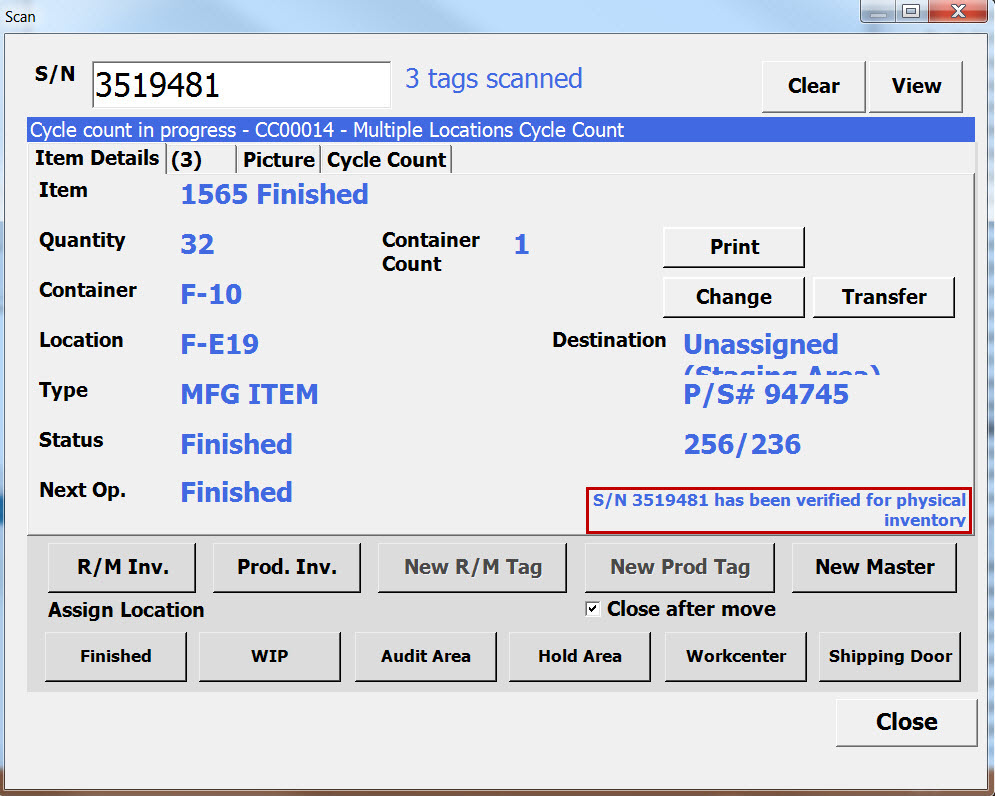
Once a Tag has been scanned, a caption will be displayed to indicate that the Serial Number has been verified for Physical Inventory.
When a Tag is verified for a Cycle Count by Item, it will look like this:
When a Tag has been verified for a Cycle Count by Location, it will look like this:
Note
As Tags are scanned on the Fork-lift Terminal, they are queued until either the queue is manually cleared using the Clear button, or the Serial Numbers are scanned to a Location. This makes it easier to scan all of the Serial Numbers in a Location together into the queue. Then, the Location only needs to be scanned once to locate all of the Tags. Users cannot mix Manufactured and Purchased Item Tags in the queue. A Warning window will display if this occurs.
As part of the Cycle Count, users should always complete the Serial Number verification by scanning the correct Location.
Note
Scanning the same Serial Number multiple times will not affect the Cycle Count. Once a Tag has been verified, it cannot be removed from the Cycle Count.
Users are now able to see how many Tags are in the queue by referring to the caption on the screen, or users can click on the  button to view the actual
Serial Number.
The Cycle Count View screen will be displayed. Click on the drop-down menu to view all Items or Locations in the Cycle Count. Users can select an Item or Location from the drop-down.
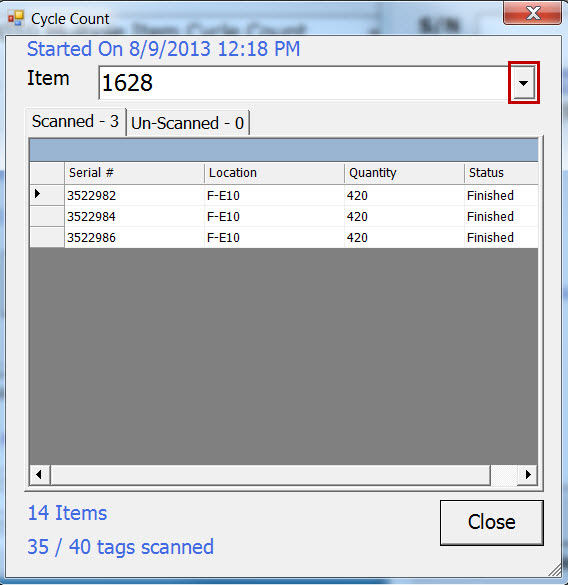
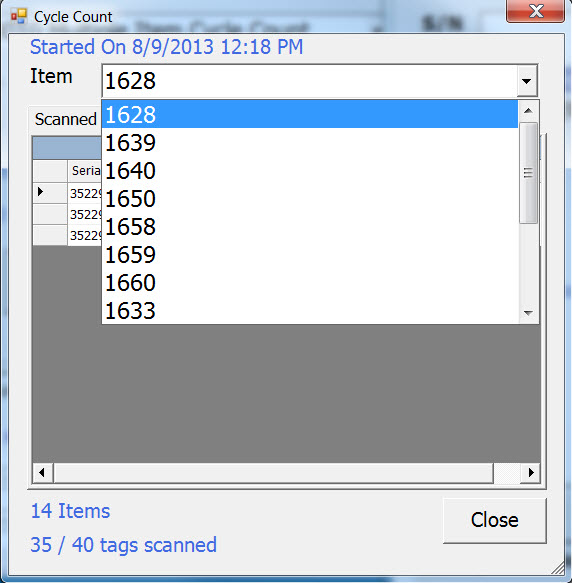
The Cycle Count screen will be displayed with scanned and un-scanned Tabs for the Item and Location.
To view the scanned Serial Numbers, click on the Scanned Tab.
Selecting the Scanned Tab for a Cycle Count by Item, it will look like this:
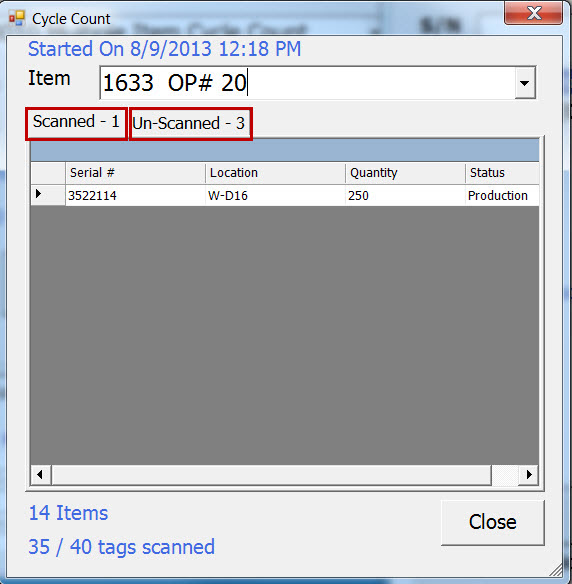
Selecting the Scanned Tab for a Cycle Count by Location, it will look like this:
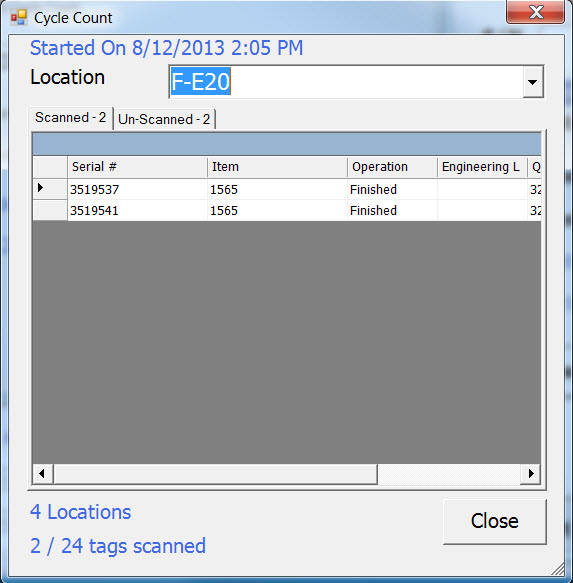
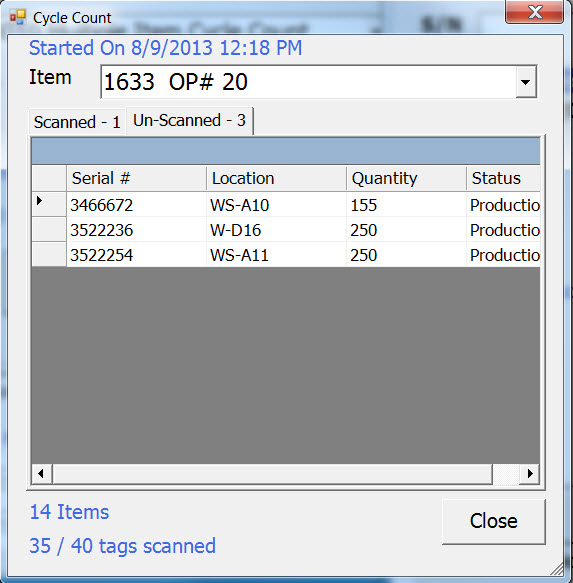
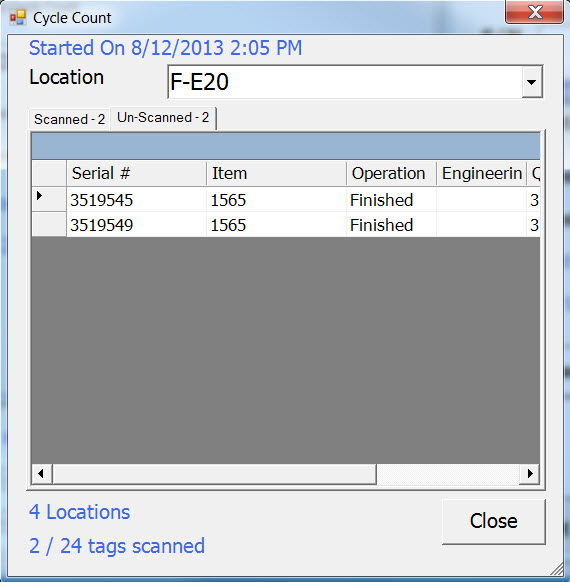
To view the un-scanned Serial Numbers, users must click on the Un-Scanned Tab.
Selecting the Un-Scanned Tab for a Cycle Count by Item, it will look like this:
Selecting the Un-Scanned Tab for a Cycle Count by Location, it will look like this:
Handheld Scanner
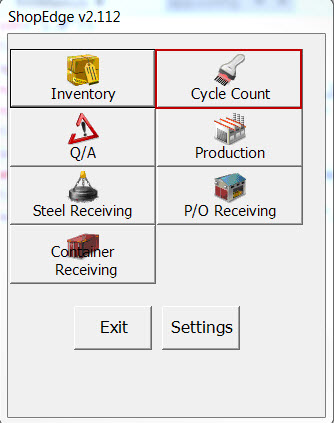
To scan existing Tags on the Handheld Scanner, open the Cycle Count module on the scanner by clicking on the  button.

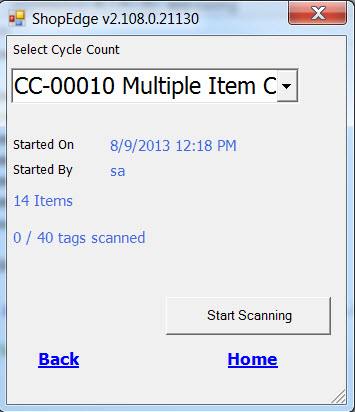
The Select Cycle Counts screen will be displayed. Users must click on the drop-down arrow to view all Cycle Counts in progress.
A Cycle Count by Item will look like this:
A Cycle Count by Location will look like this:
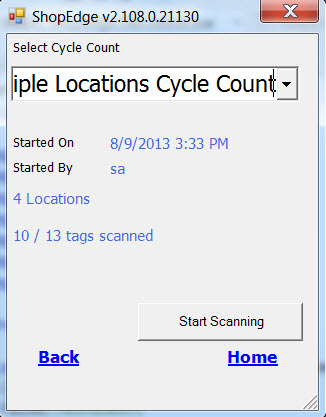
Select the Cycle Count that you wish to access and click on the  button.
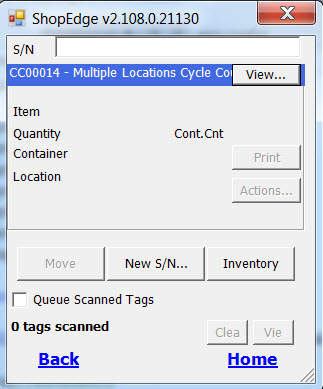
The Scan screen will be displayed. Users can begin the Cycle Count by scanning the Serial Number.
Scanning the Serial Number of a Cycle Count by Item will look like this:
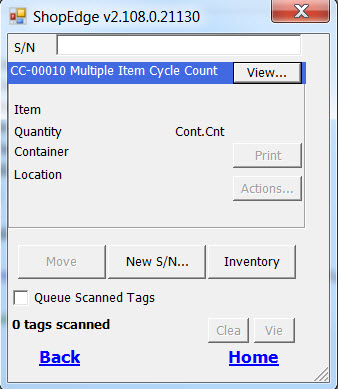
Scanning the Serial Number of a Cycle Count by Location will look like this:
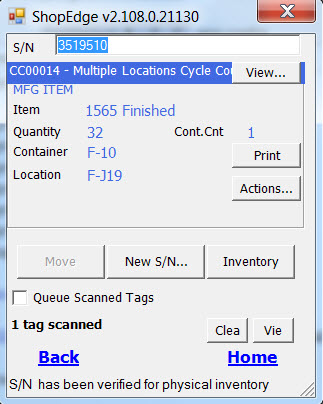
Once a Tag has been scanned, a caption will be displayed to indicate that the Serial Number has been verified for Physical Inventory.
When a Tag is verified for a Cycle Count by Item, it will look like this:
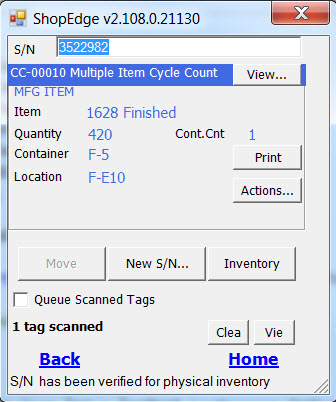
When a Tag has been verified for a Cycle Count by Location, it will look like this:
Note
As Tags are scanned on the Fork-lift Terminal, they are queued until either the queue is manually cleared using the Clear button, or the Serial Numbers are scanned to a Location. This makes it easier to scan all of the Serial Numbers in a Location together into the queue. Then, the Location only needs to be scanned once to locate all of the Tags. Users cannot mix Manufactured and Purchased Item Tags in the queue. A Warning window will display if this occurs.
As part of the Cycle Count, users should always complete the Serial Number verification by scanning the correct Location.
Note
Scanning the same Serial Number multiple times will not affect the Cycle Count. Once a Tag has been verified, it cannot be removed from the Cycle Count.
Users are now able to see how many Tags are in the queue by referring to the caption on the screen, or users can click on the  button to view the actual
Serial Number.
The Cycle Count View screen will be displayed. Click on the drop-down menu to view all Items or Locations in the Cycle Count. Users can select an Item or Location from the drop-down.
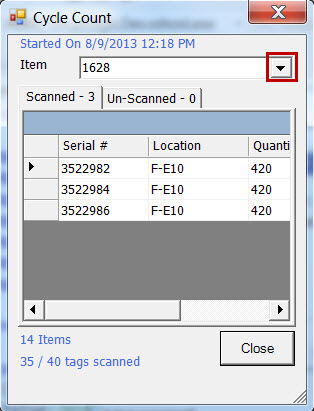
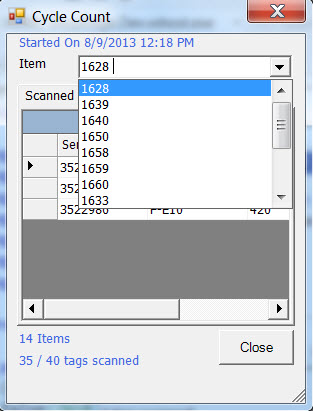
The Cycle Count screen will be displayed with scanned and un-scanned Tabs for the Item and Location.
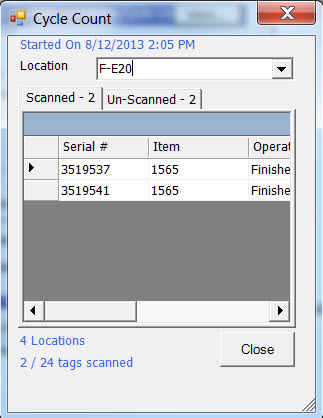
To view the scanned Serial Numbers, click on the Scanned Tab.
Selecting the Scanned Tab for a Cycle Count by Item, it will look like this:
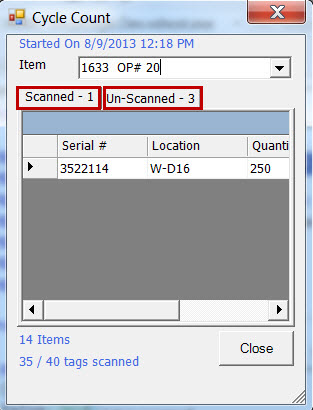
Selecting the Scanned Tab for a Cycle Count by Location, it will look like this:
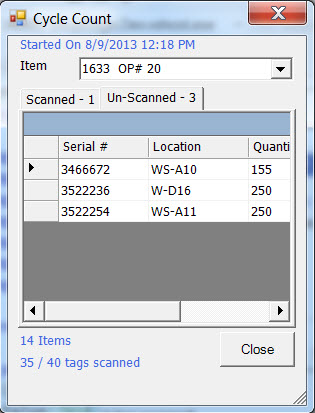
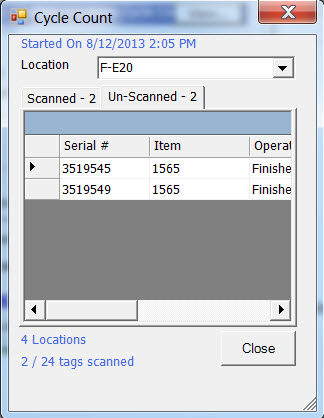
To view the un-scanned Serial Numbers, users must click on the Un-Scanned Tab.
Selecting the Un-Scanned Tab for a Cycle Count by Item, it will look like this:
Selecting the Un-Scanned Tab for a Cycle Count by Location, it will look like this:
Creating Tags for Unidentified Purchased Items
As part of the Cycle Count process, users might find bins that do not have a Serial Number Tag to scan. In this case, users must first print a new Serial Number for the bin, and then scan the Serial Number for verification. Users have the ability to do this on the Android Application, Fork-lift Terminal, and the Handheld Scanner.
Android Application
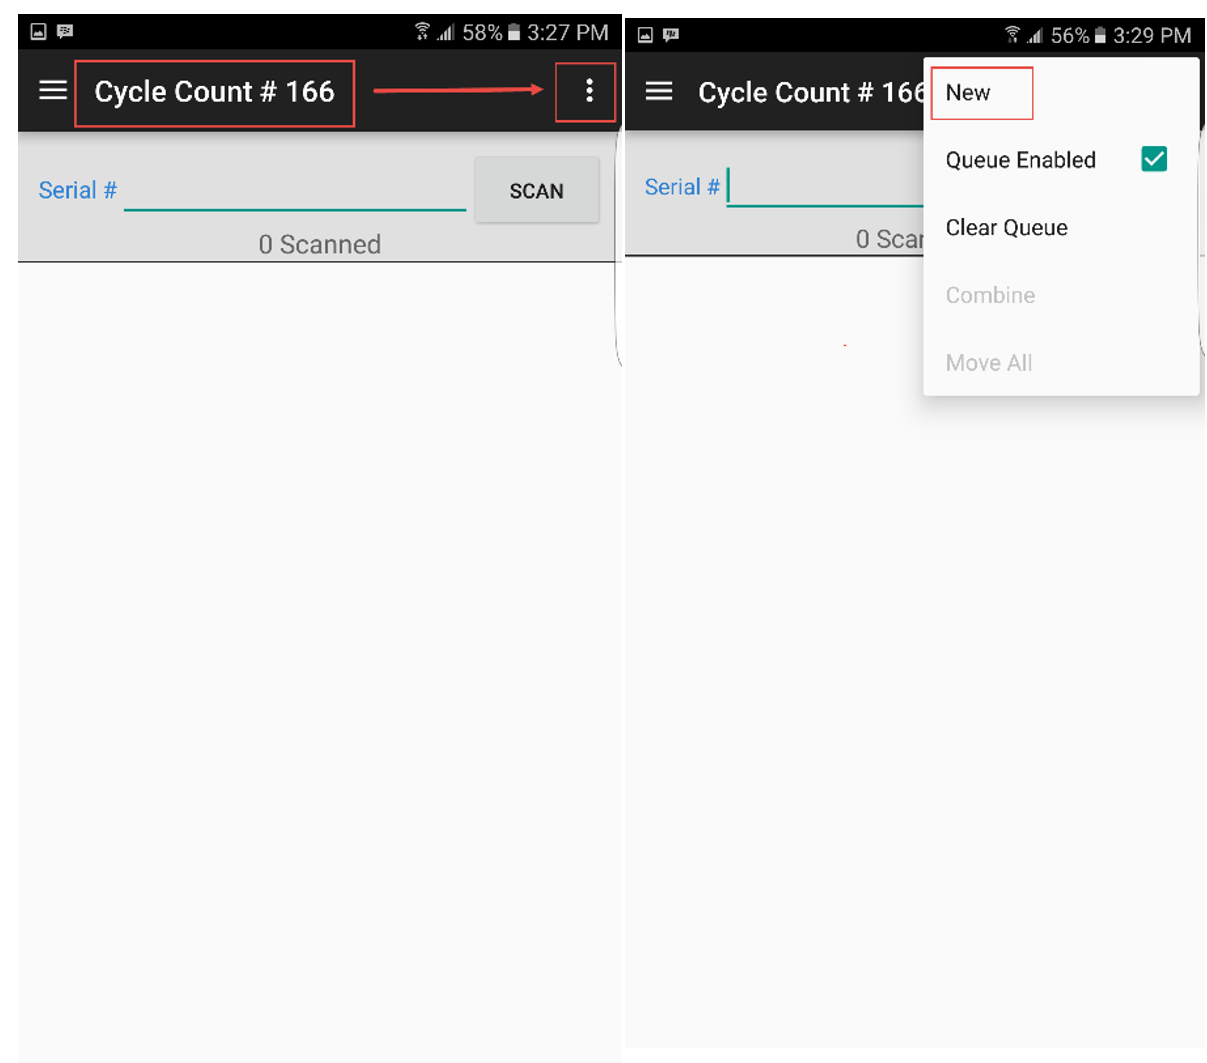
If users wish to create a Tag as part of the Cycle Count, locate the Cycle Count you wish to create Tags for, and select Start Scanning. The Scanning window will appear.
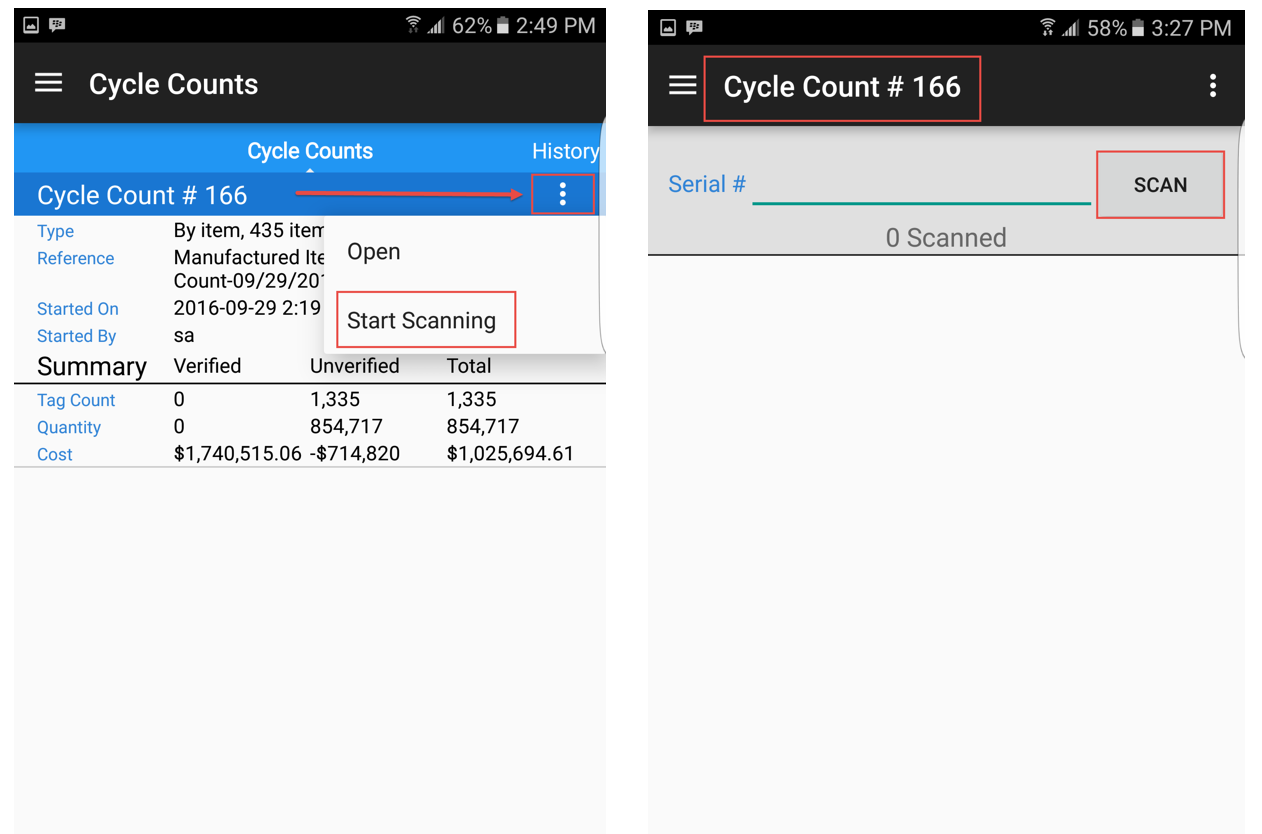
To create a new Tag, select New from the menu at the top right side of the screen.
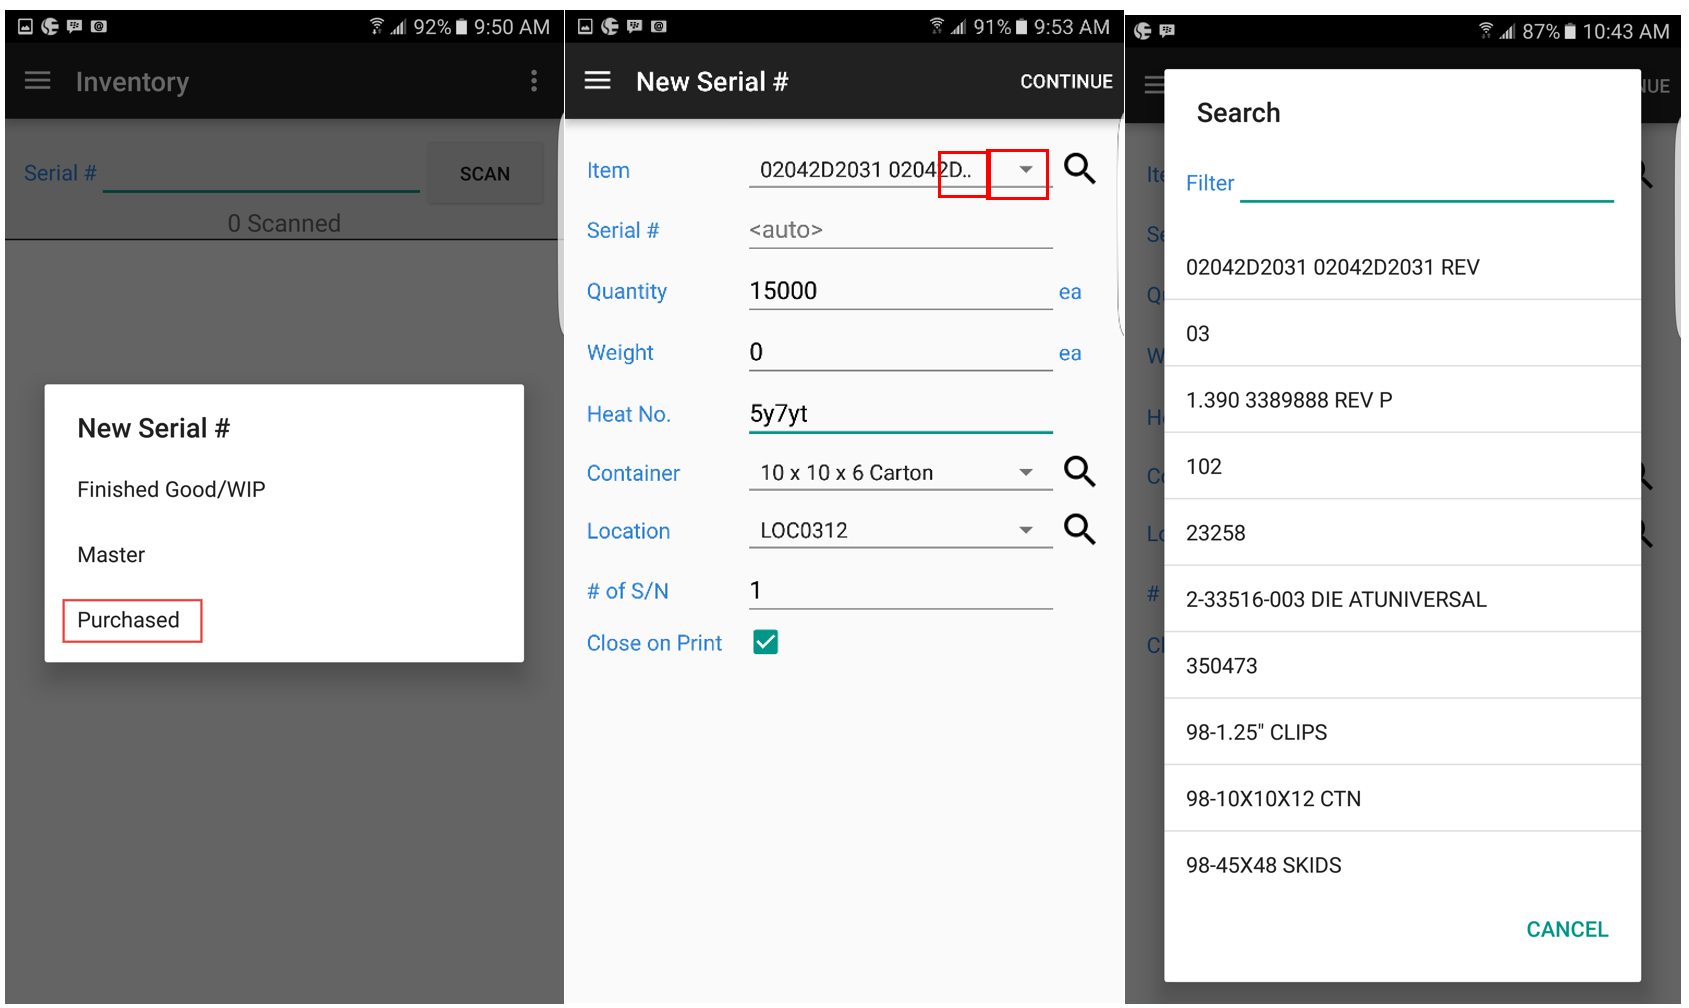
To create a Serial Number for a Purchased Item, select the Purchased option from the screen on the Android Application. The New Serial # screen will appear.
Next, select the Item you are creating the label for from the drop-down menu, or use the search function to look the Item up.
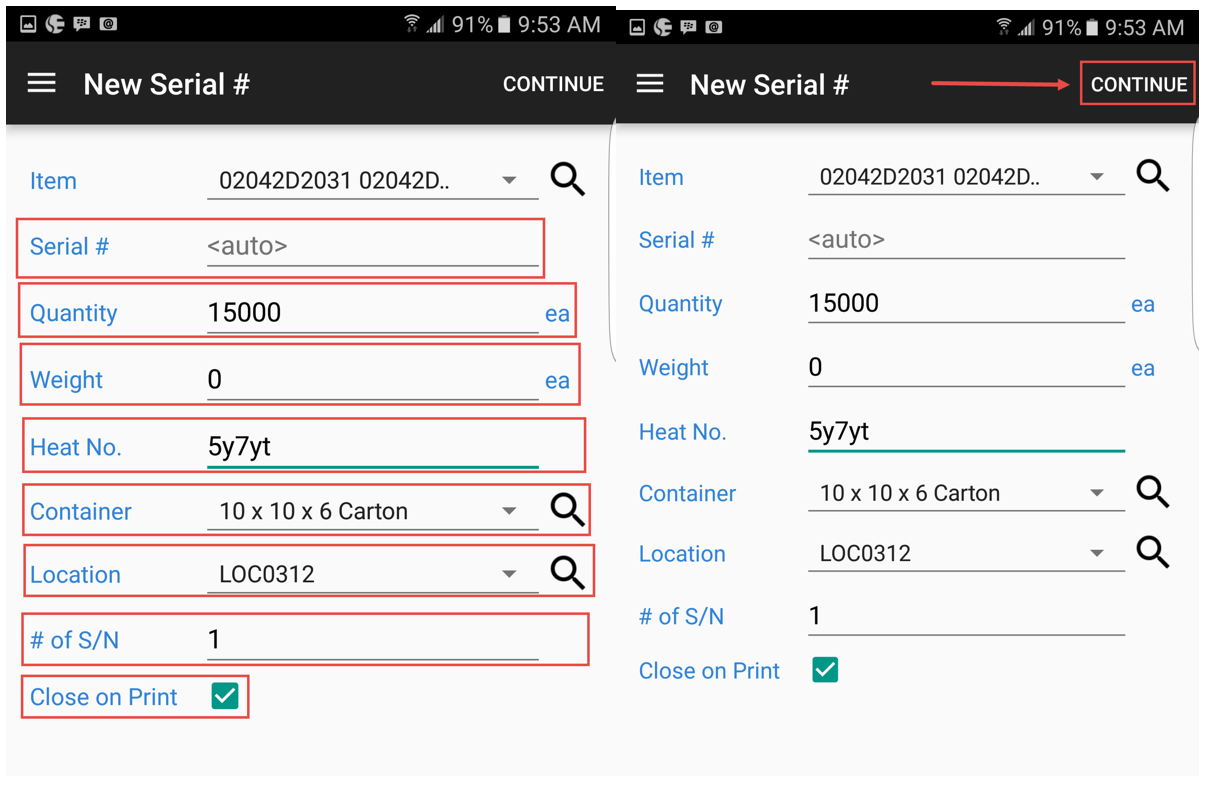
If you wish to re-use the Serial Number from the Vendor, users can enter it into the system. Skip to have the system assign a Serial Number. Enter in the Quantity of the Item, and the Unit of Measure will default based on the default Unit of Measure that is set to the Item. Enter in the Weight, but it is not required.
Sometimes in the case of Raw Material, the Quantity and Weight may be the same. Enter in a Heat number, Container, and Location. Indicate the number of Serial Numbers you wish to create. For example, if you have 4 coils of steel with the same Heat information and Quantity, you may select 4 Serial Numbers so the system prints 4 different labels. If you would like the New Serial # screen to close once you’ve printed the label, ensure the box is checked. If you would like to create more new labels, make sure the box is not selected. Once the information is complete, touch Continue on the top right corner of the screen.
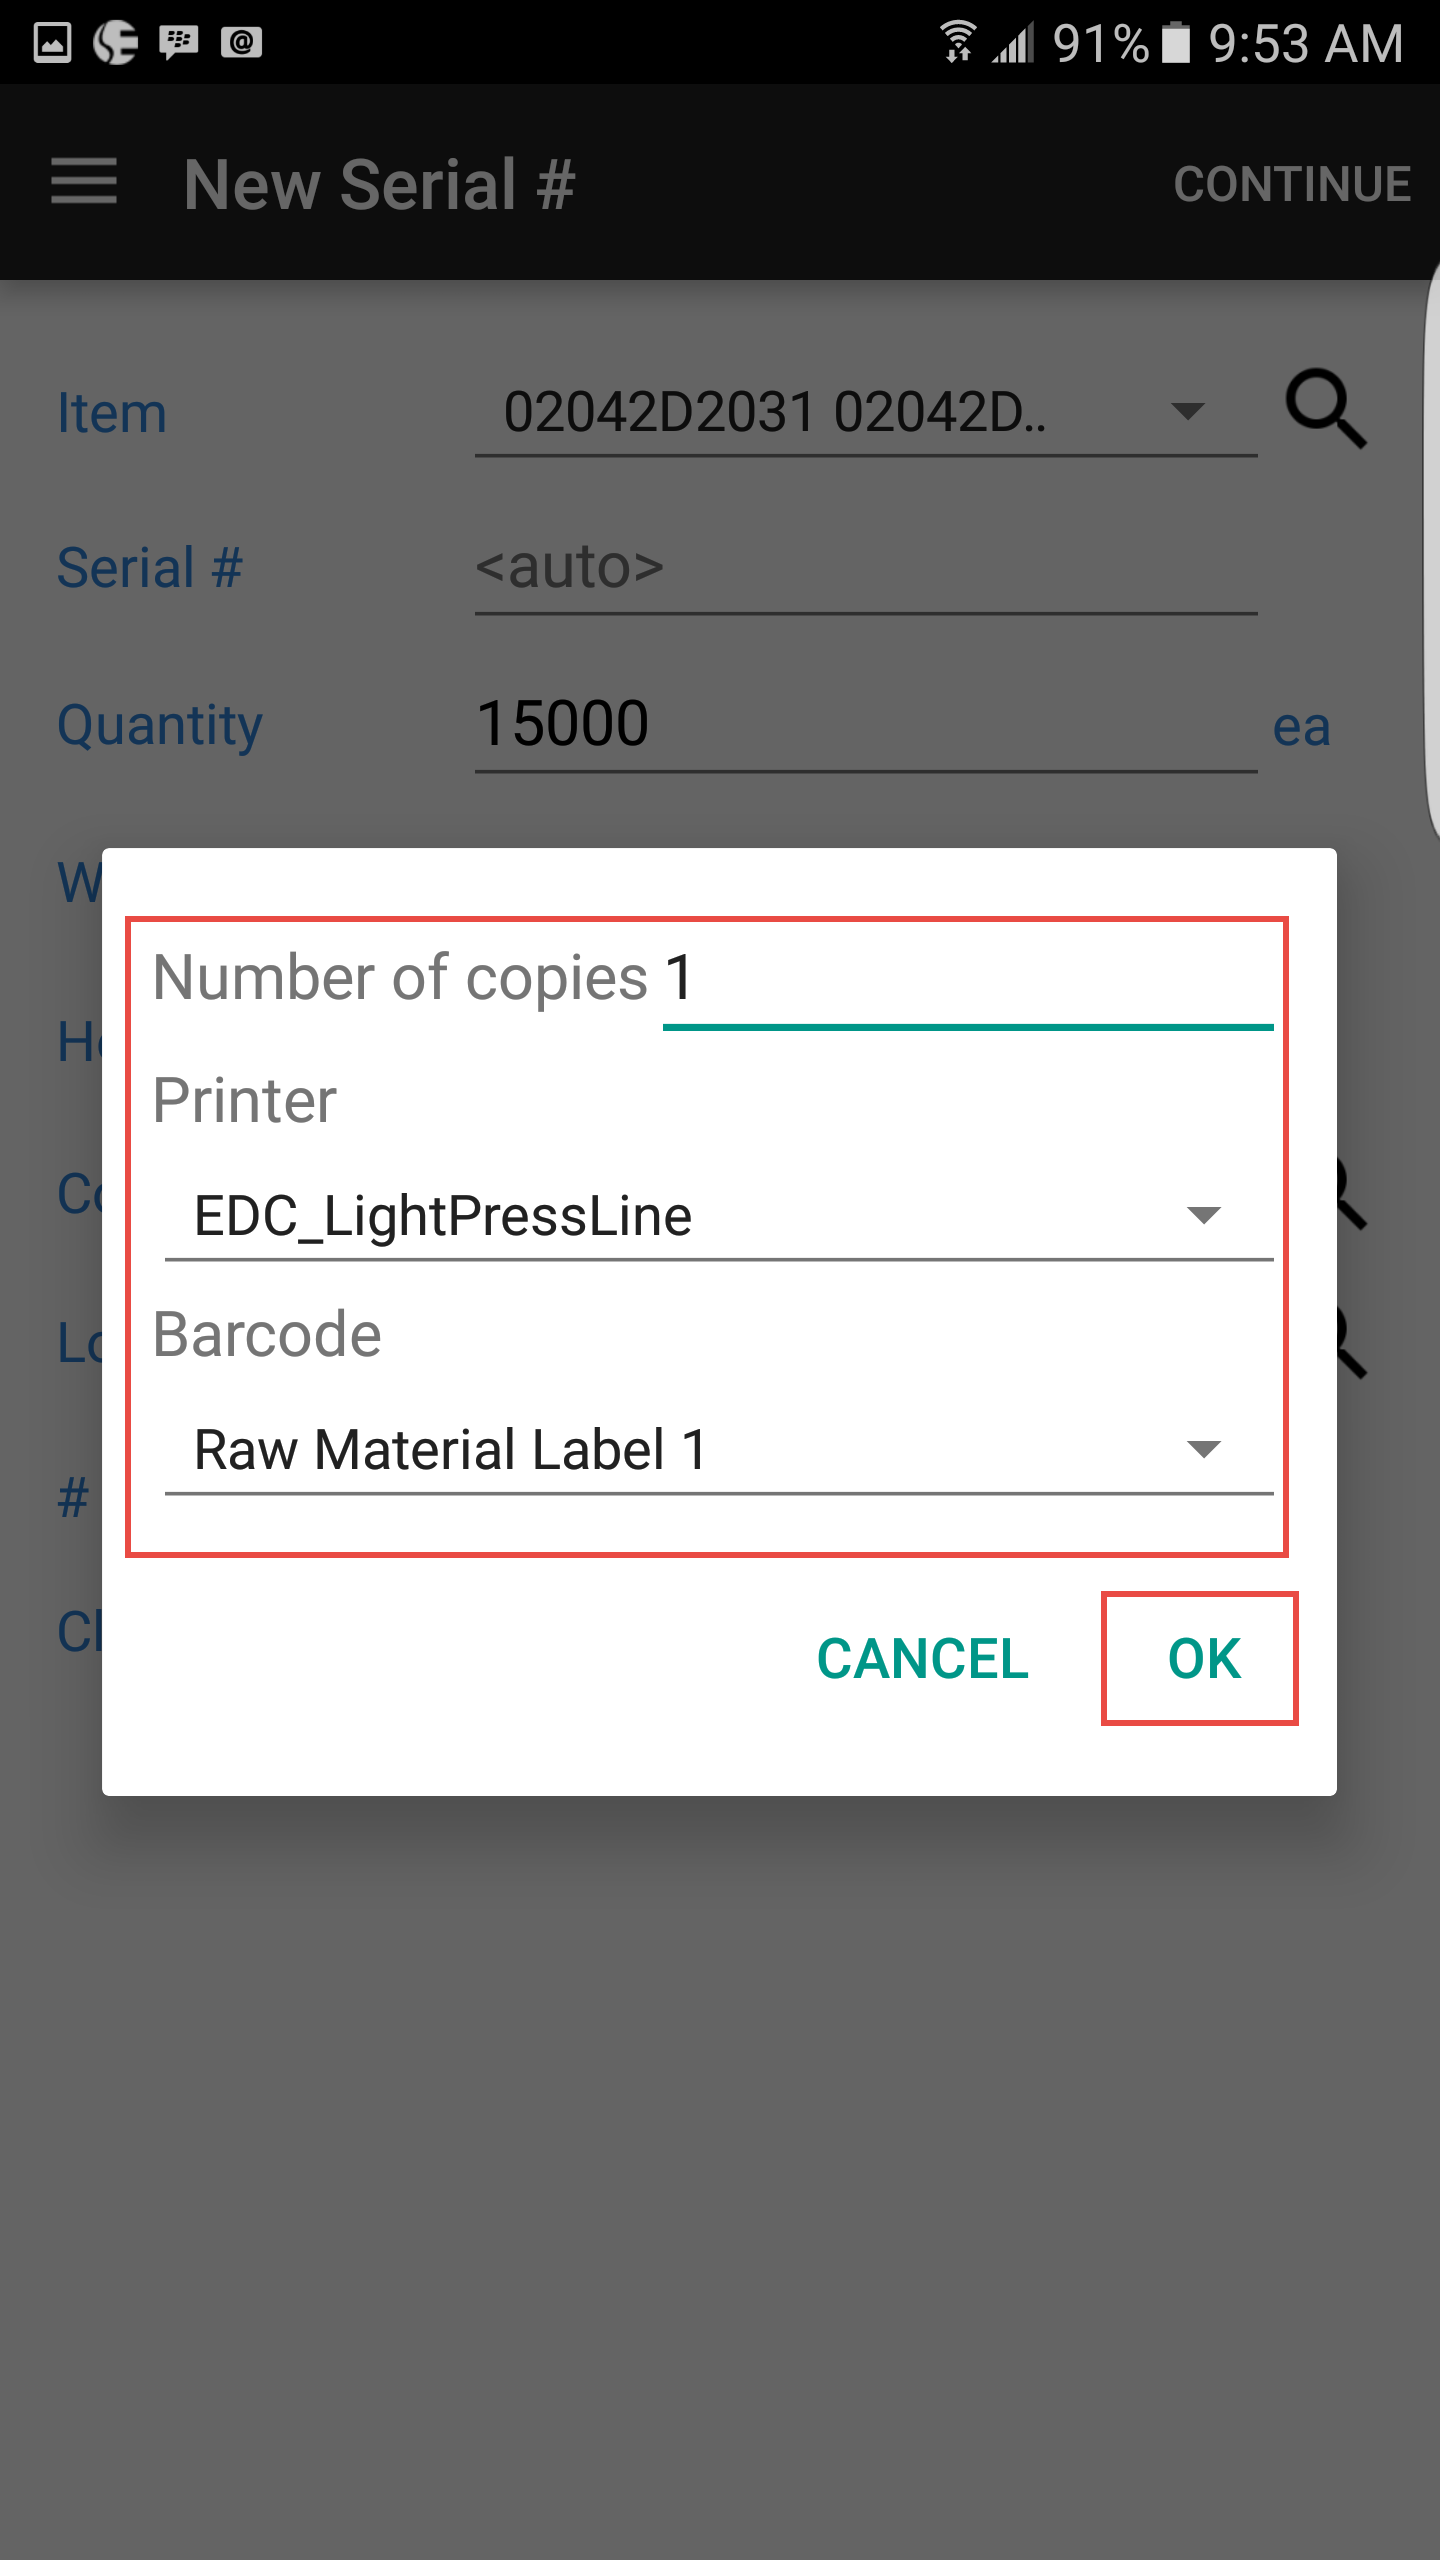
You will then be prompted for the number of copies to print for the label, and to select the printer you wish to print to. Users will also be prompted for the type of label to print, if there is more than one option. The printer will default to the last printer you printed to. When you are ready to print, touch Ok.
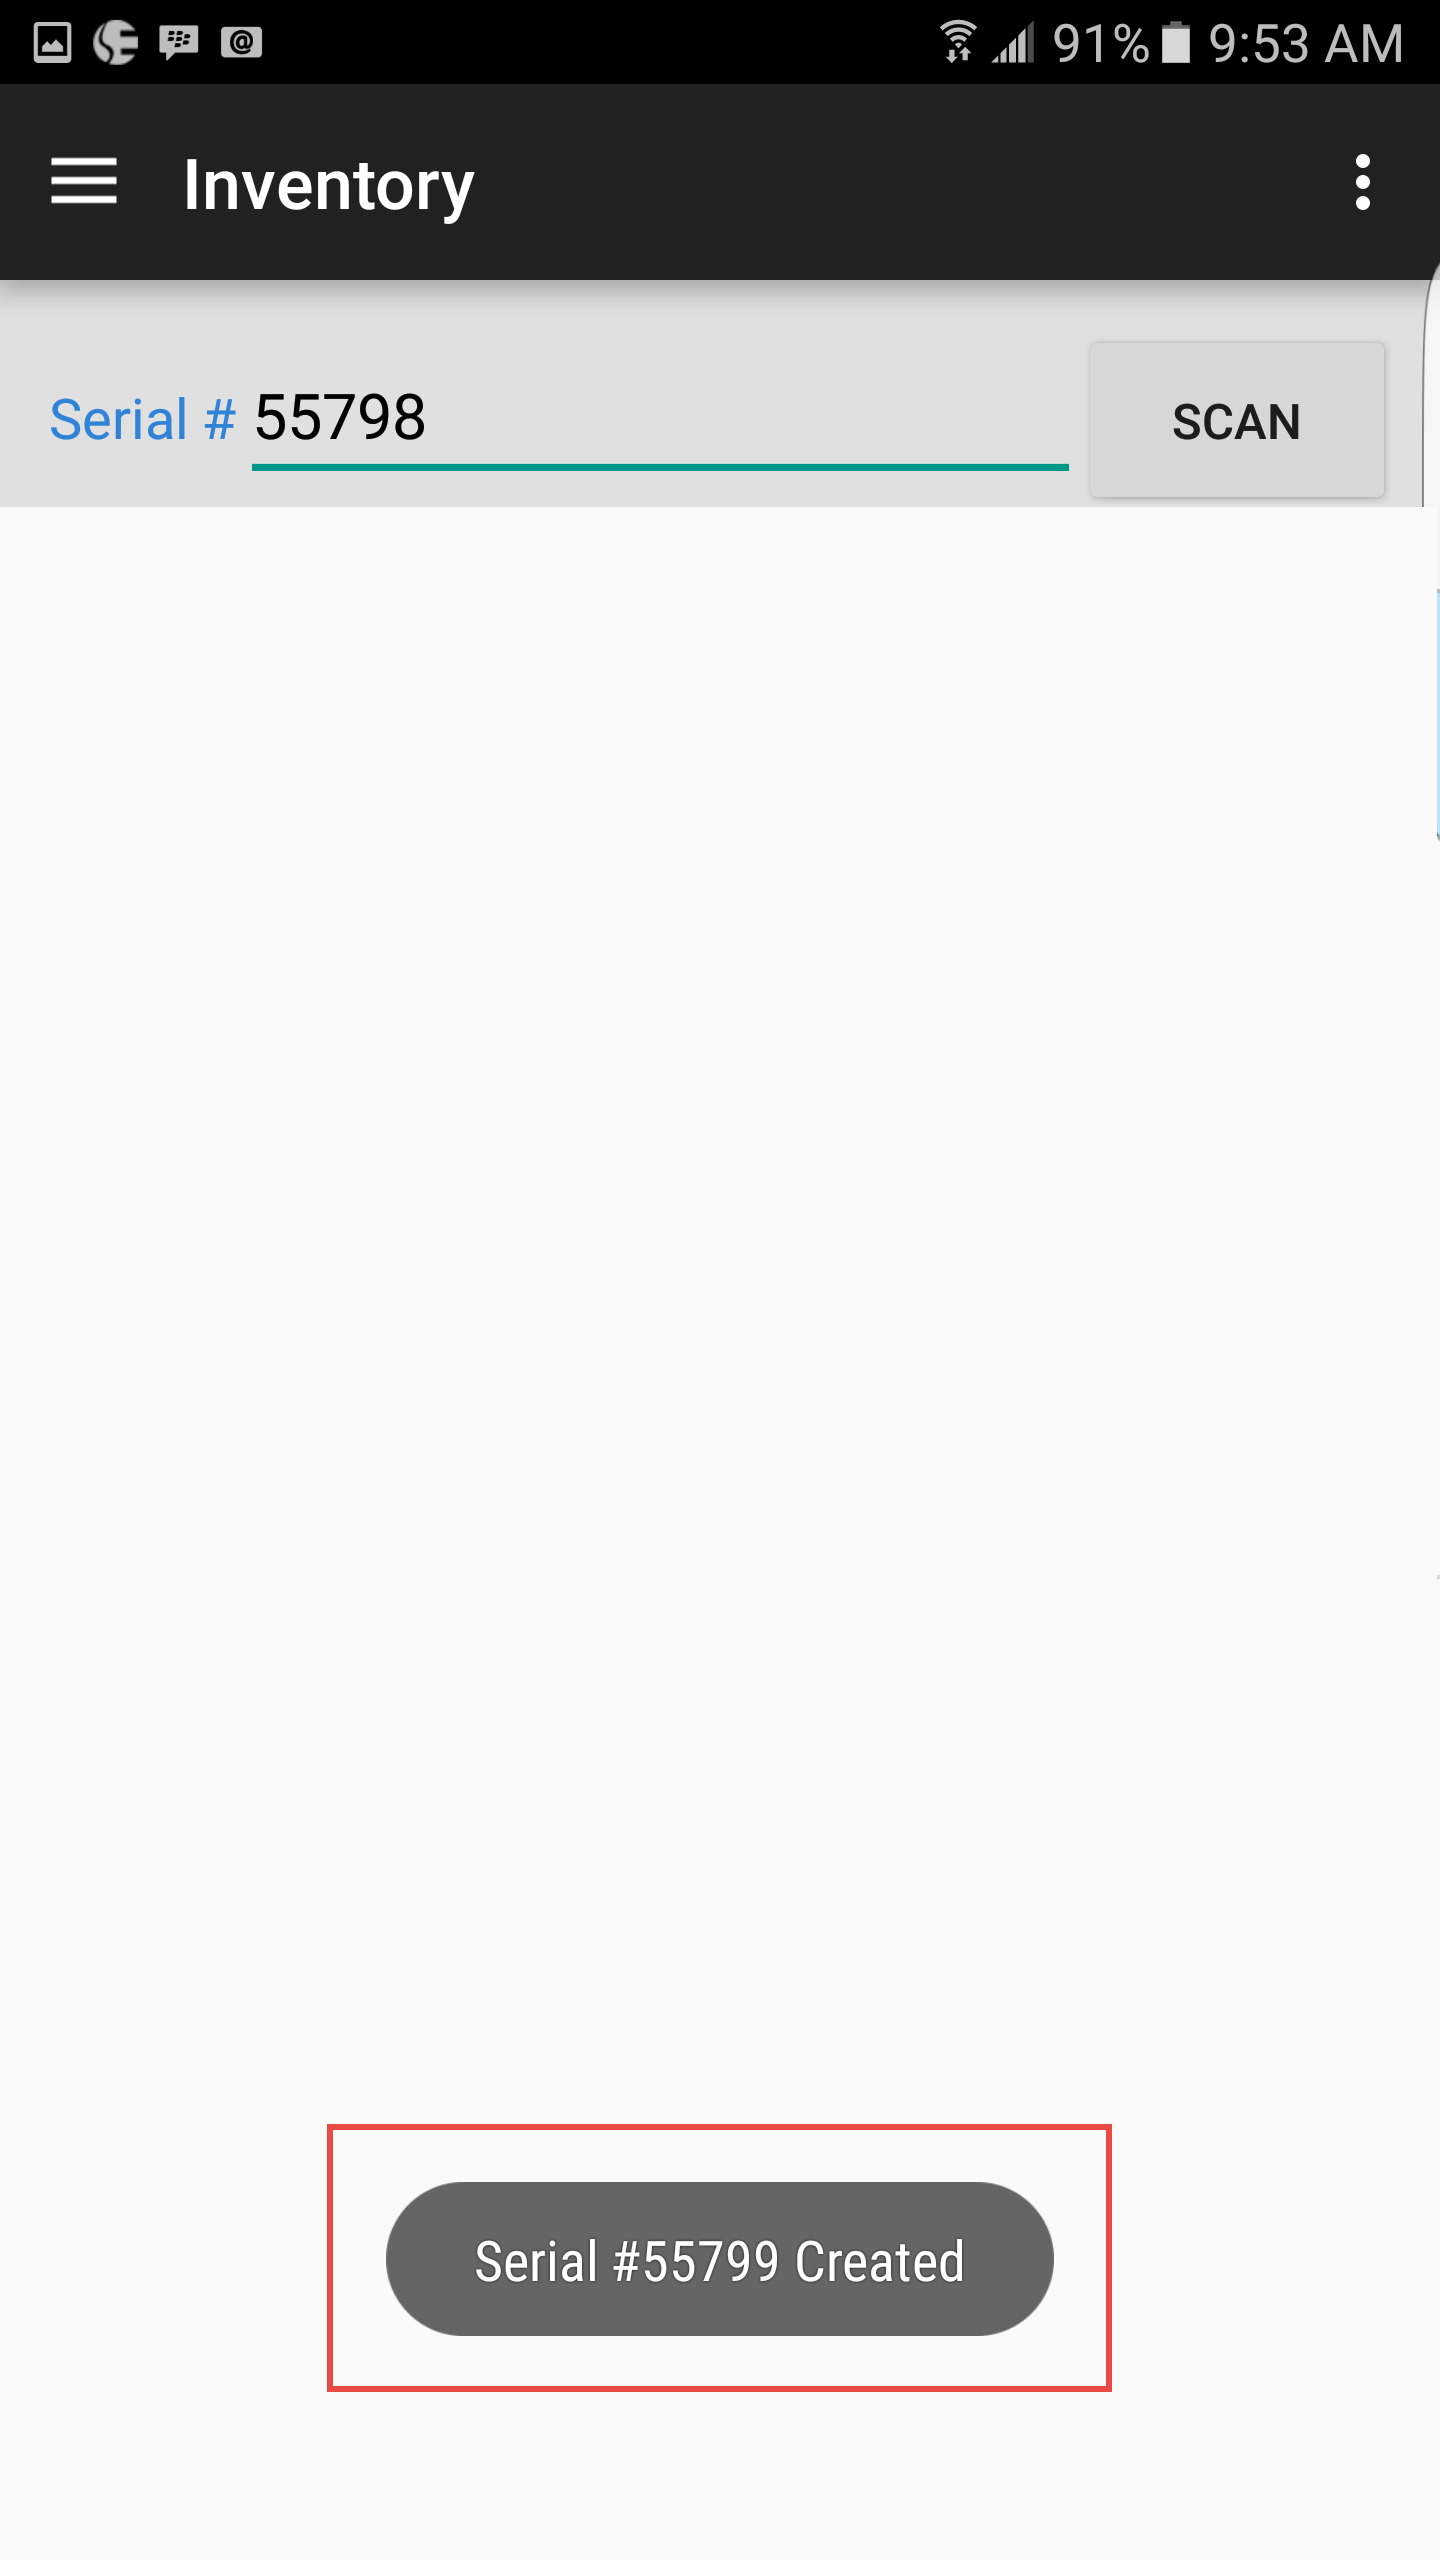
The system will let you know that the Serial Number has been created with a Confirm message.
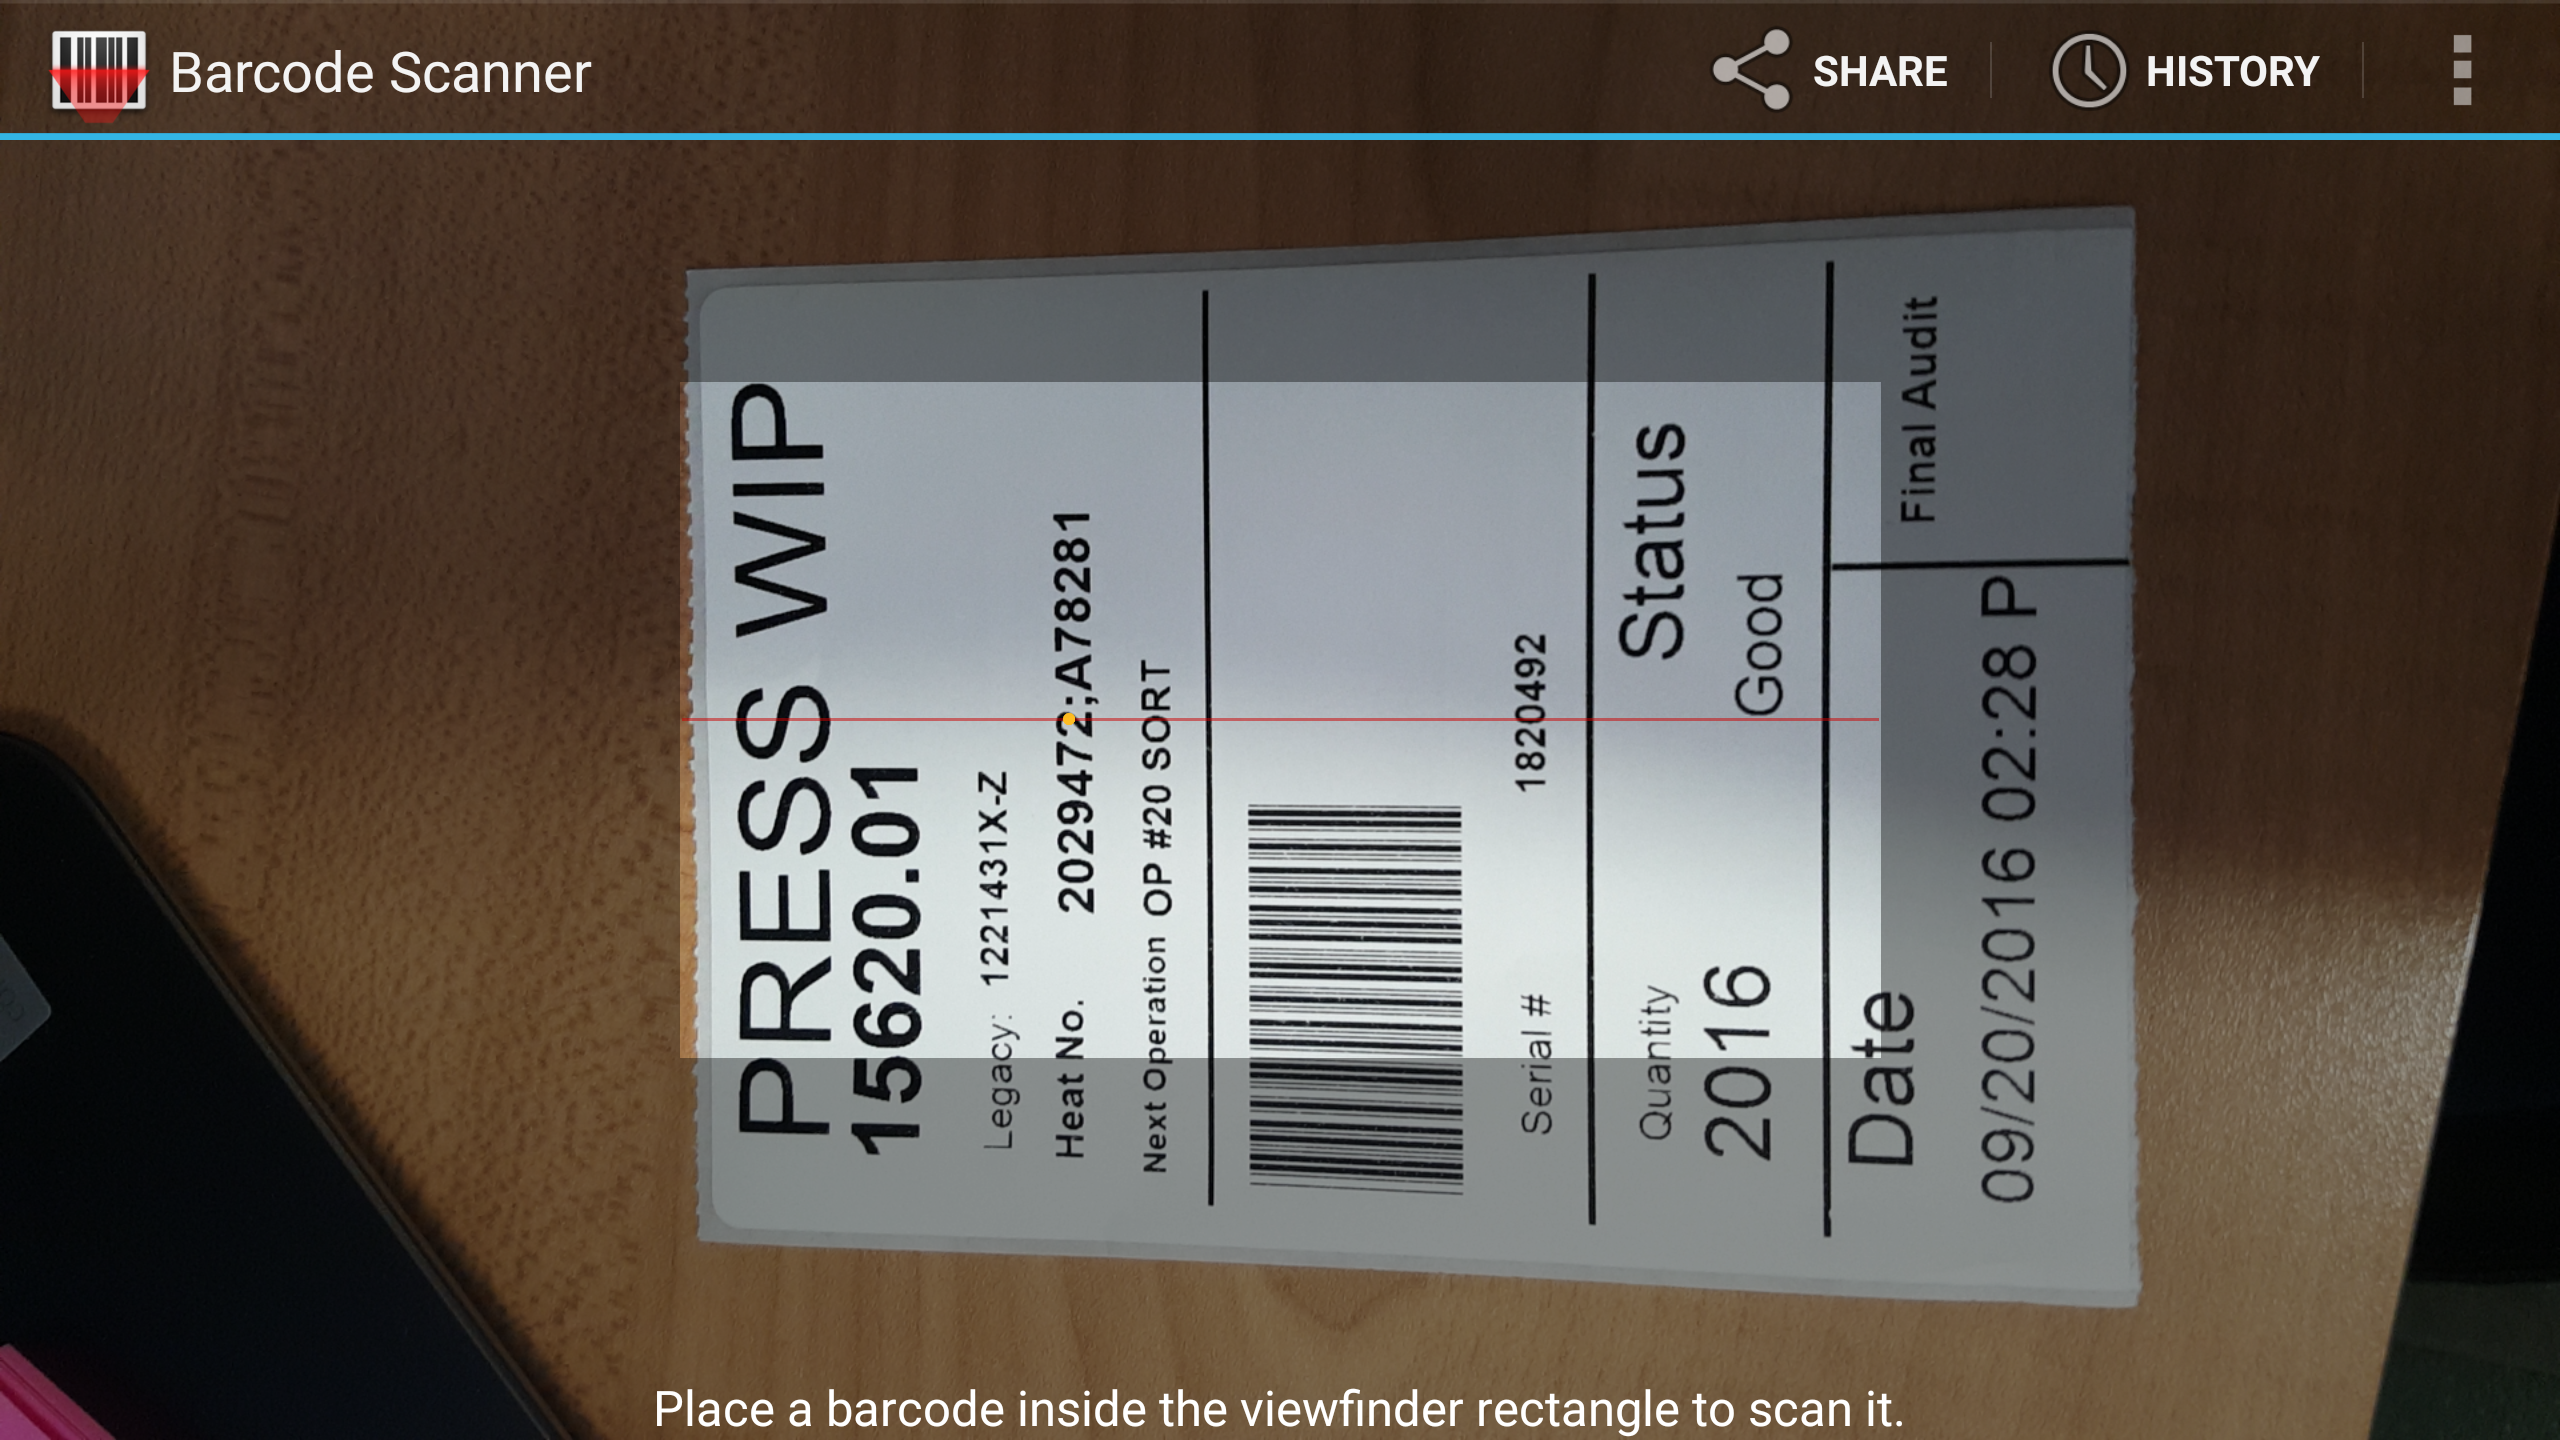
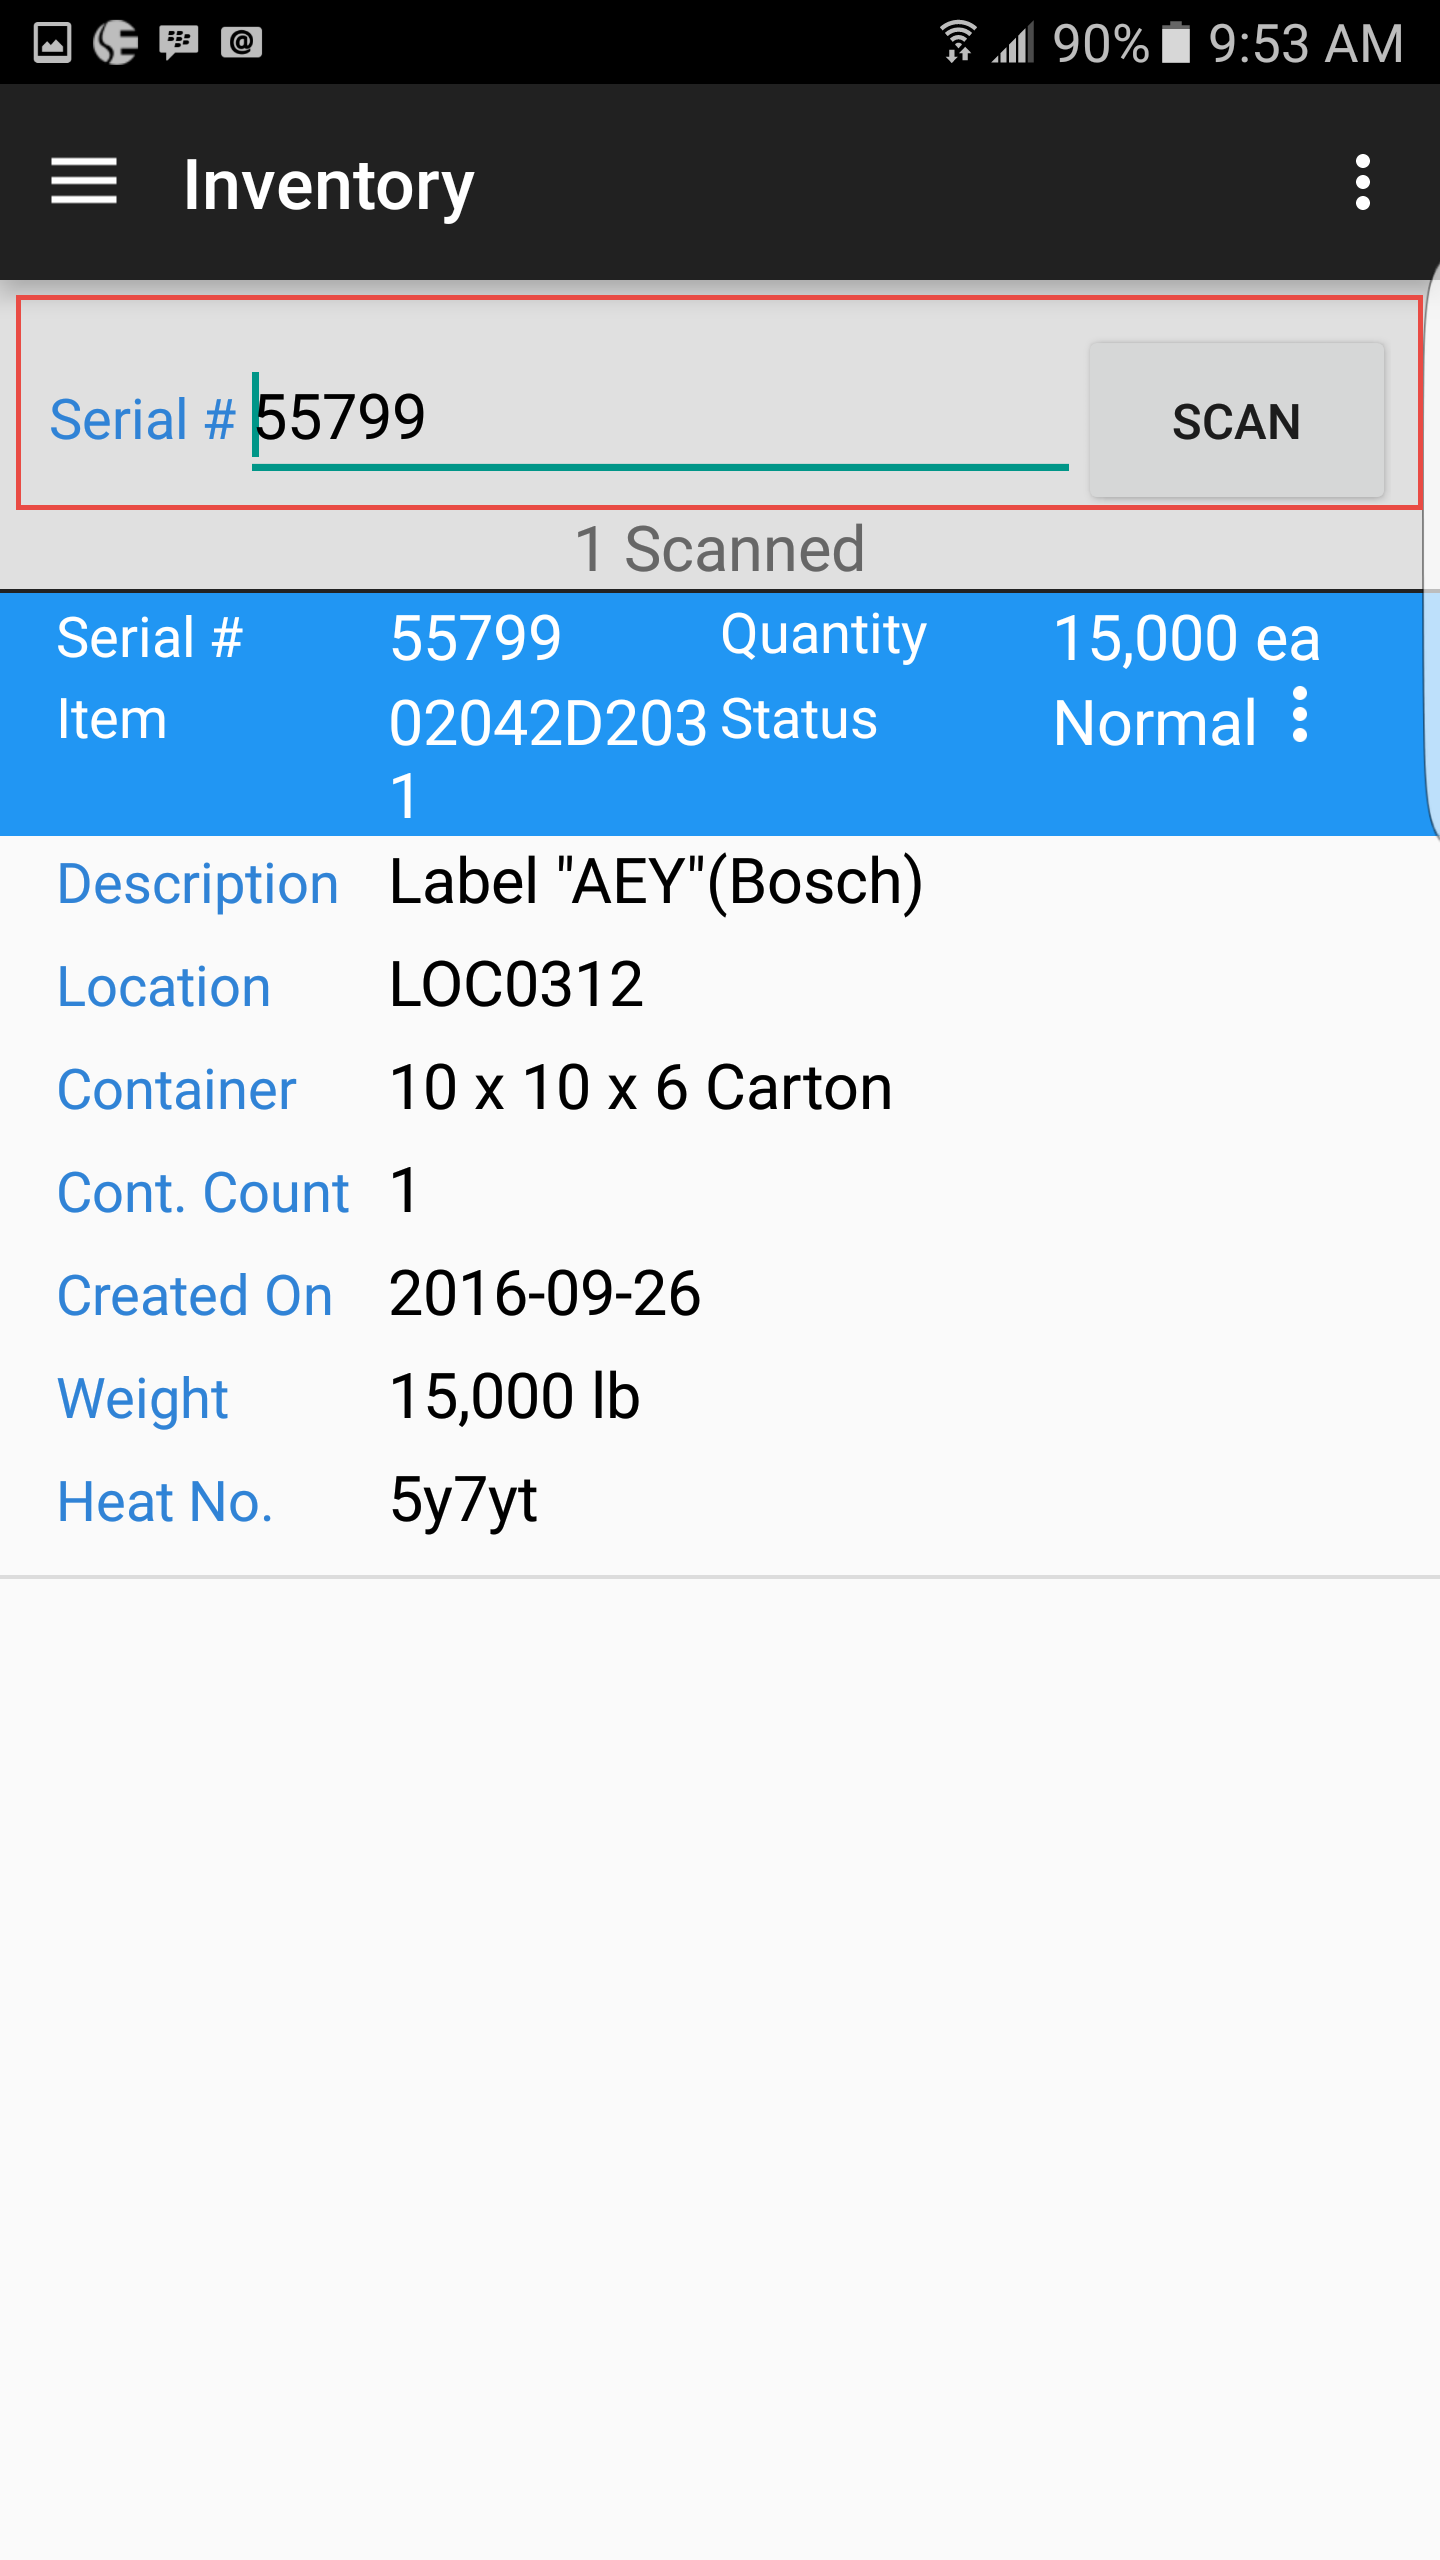
Make sure you scan or enter in the Serial Number once the label has been printed and placed on the Item. This will update the Inventory in the system.
Note
Users can cancel creating a new Serial Number by clicking the device’s Back button. Users will be returned back to the Scanning screen.
Fork-lift Terminal
To create an Inventory Tag Label for a Purchased Item with the Fork-lift Terminal, users must open the Scan window. From the main menu, click on the  button, or click on the
  button from any other location on the Fork-lift Terminal Application.
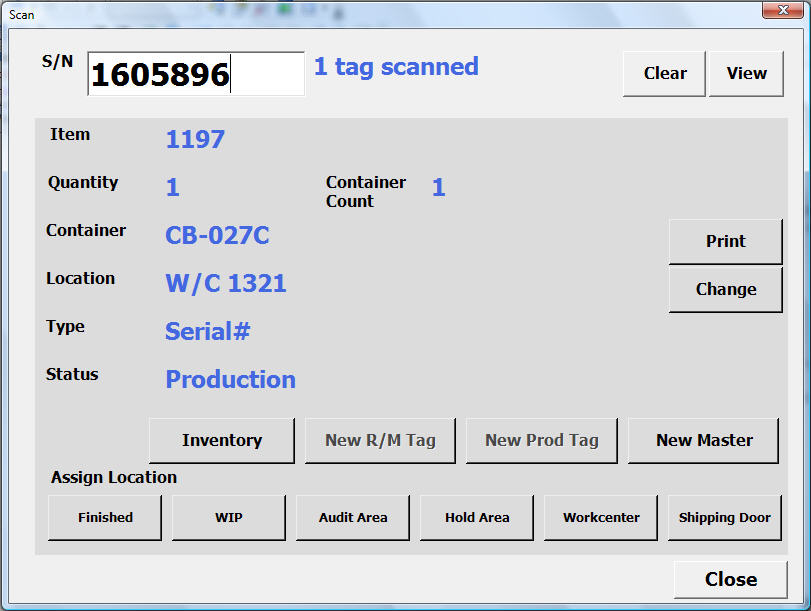
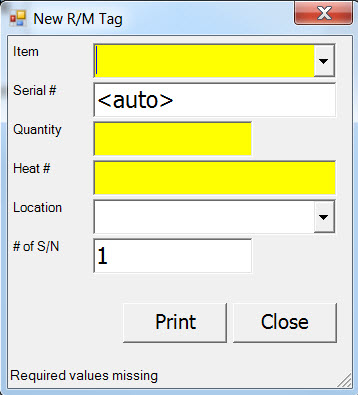
Next, click on the |images/cyclecounts/newrmtag-1.jpg| button. The new Raw Material window will appear.
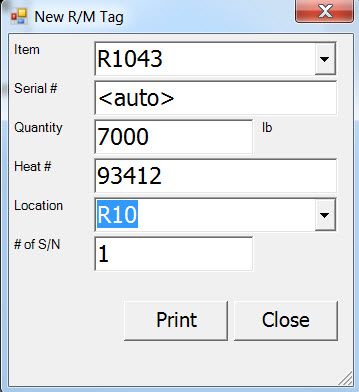
All required fields are highlighted in yellow. The fields can either be scanned directly from the Vendor Barcode Label, or manually entered in.
Once all of the necessary fields are entered in, click on the  button.
Note
If the Width and Gauge values have been set on the Purchased Item screen, then the Attributes window will be displayed where the values must be entered.
A window will appear prompting users to print a Barcode Label.
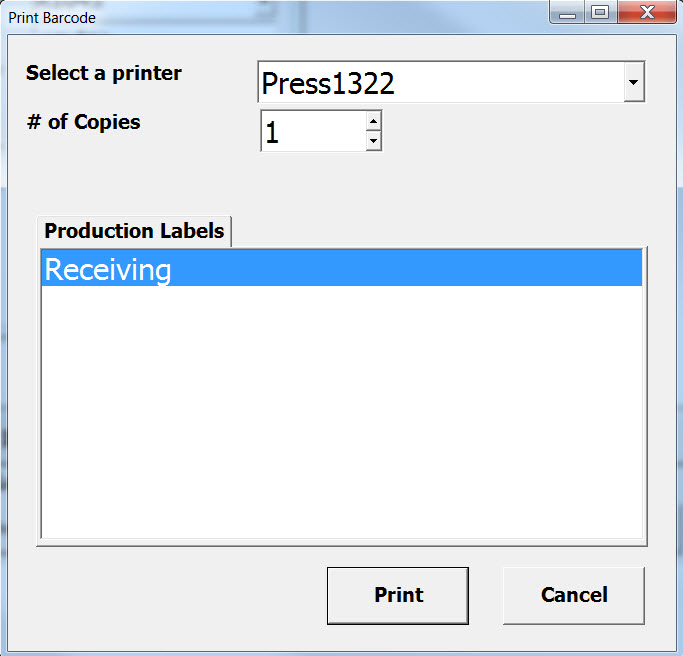
Verify that number of copies to be printed and select the appropriate Printer and Printer settings. Click on the  button. The Barcode Label will be printed.
Note
Printing the Barcode is only required if the Inventory does not have a Vendor Barcode Label on it already. If users decide not to print the Barcode, the system will still create the R/M Tag without the Barcode being printed.
A message will be displayed indicating that the R/M Tag has been created successfully.
Handheld Scanner
To create a Tag for a Purchased Item using the Handheld Scanned, simply open the Scan window. From the main menu, click on the  button.
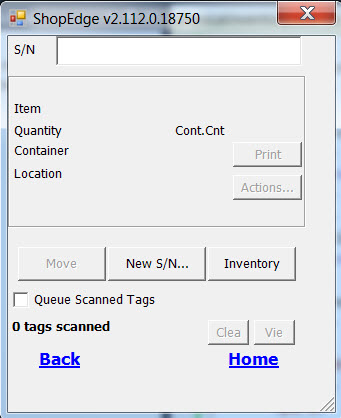
Then, click on the  button. The Create New S/N screen will appear where users can click on the
  button to
open the New R/M Tag screen.
All required fields are highlighted in yellow. The fields can either be scanned directly from the Vendor Barcode Label, or manually entered in.
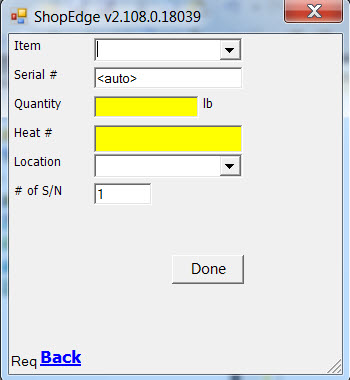
Once all of the required fields are entered, click on the  button.
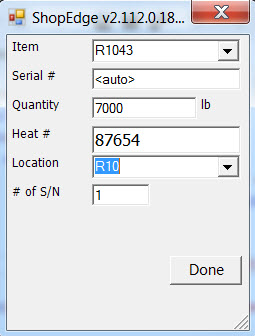
Note
If the Width and Gauge values have been set on the Purchased Item screen then the Attributes window will be displayed where the values must be entered.
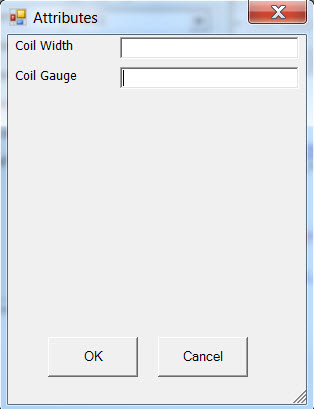
A window will appear prompting users to print a Barcode Label.

Verify the number of copies to be printed as well as the Printer and Printer settings. Then, click on the  button. The Barcode Label will be printed.
Note
Printing the Barcode is only required if the Inventory does not have a Vendor Barcode Label on it already. If users decide not to print the Barcode, the system will still create the R/M Tag without the Barcode being printed.
A message will be displayed indicating that the R/M Tag has been created successfully.
Creating Tags for Unidentified Manufactured Items
As part of the Cycle Count process, users might find bins that do not have a Serial Number Tag to scan. In this case, users must first print a new Serial Number for the bin, and then scan the Serial Number for verification. Users have the ability to do this on the Android Application, Fork-lift Terminal, and the Handheld Scanner.
Android Application
If users wish to create a Tag as part of the Cycle Count, locate the Cycle Count you wish to create Tags for, and select Start Scanning. The Scanning window will appear.

To create a new Tag, select New from the menu at the top right side of the screen.

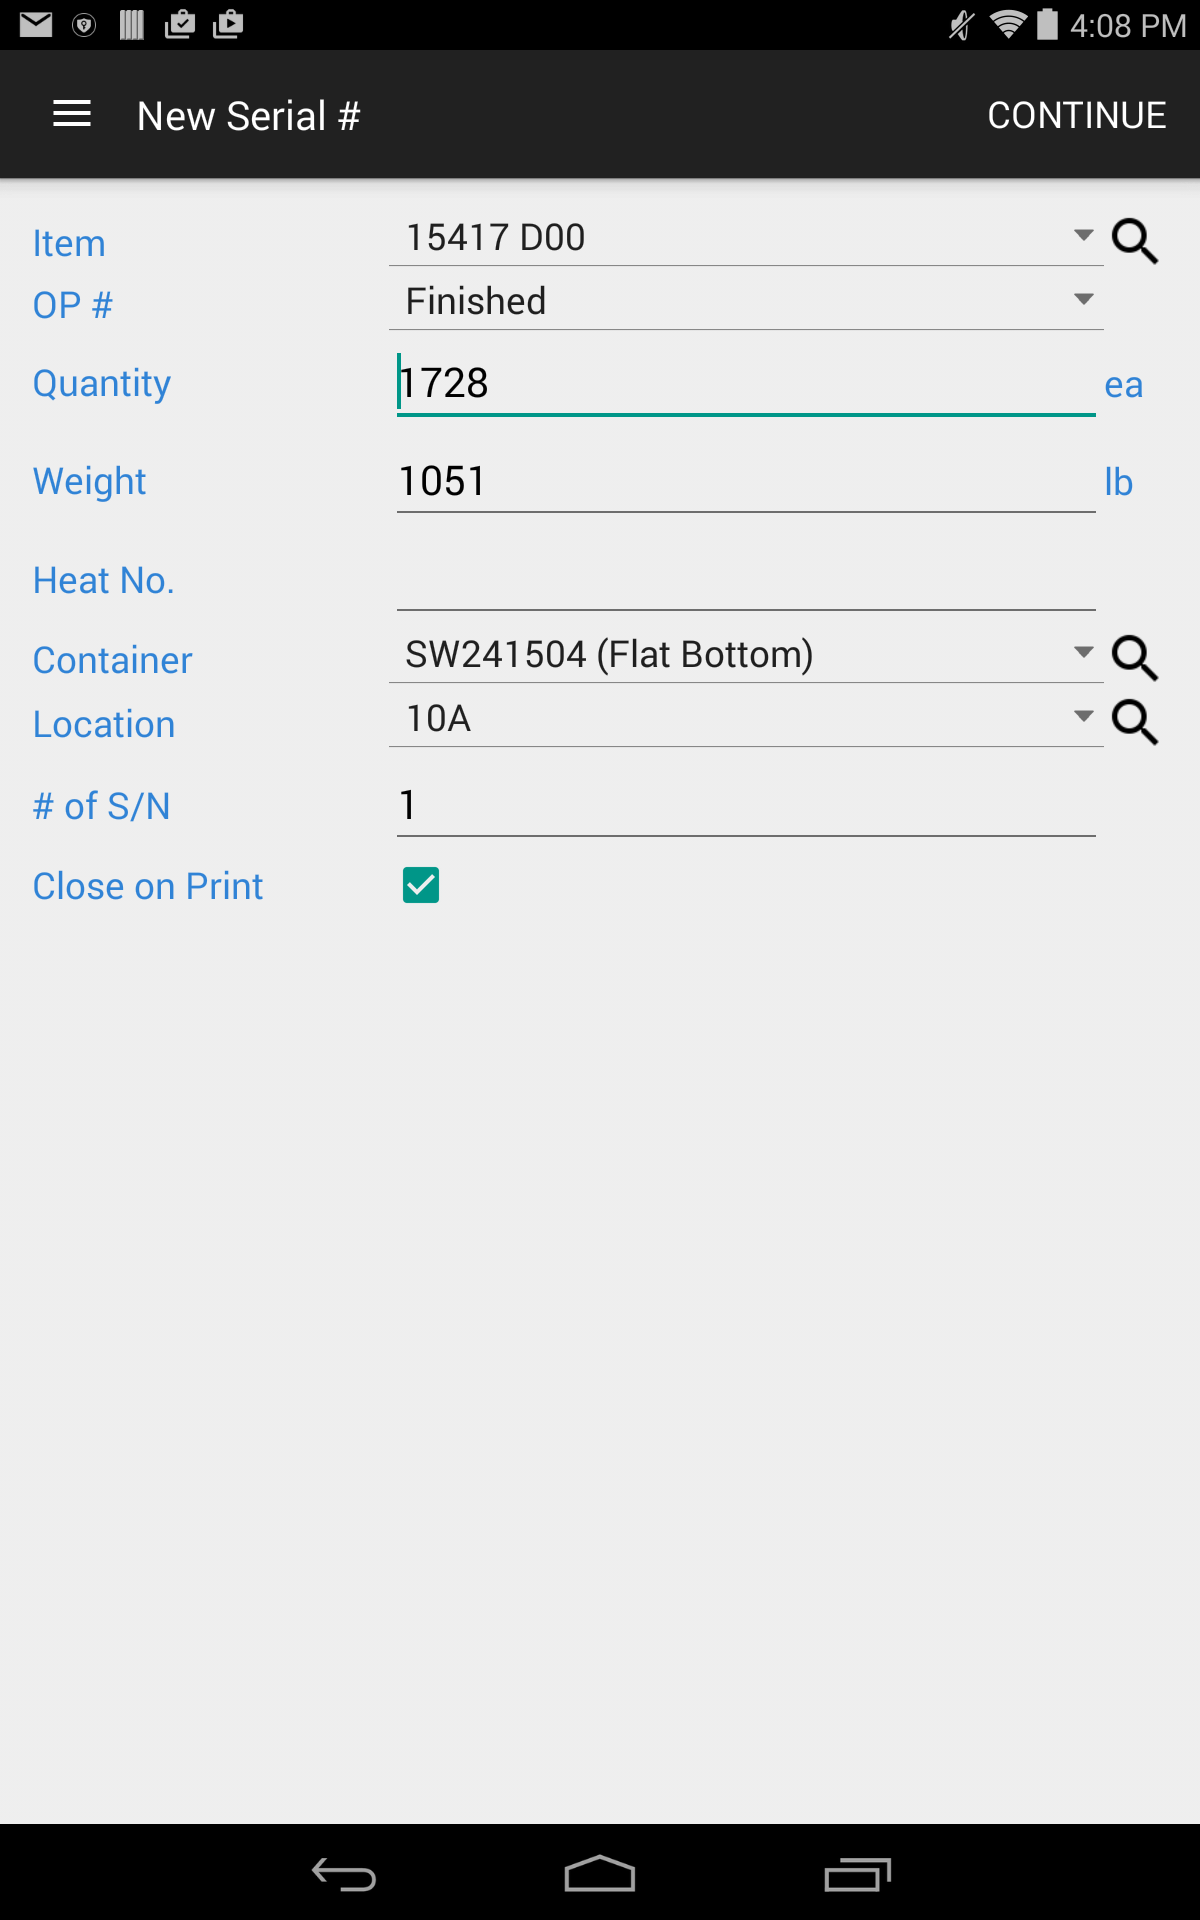
To create a Serial Number for a Finished Good/WIP Item, select the Finished Good/WIP option from the screen of the Android Application. The new Serial # screen will appear.
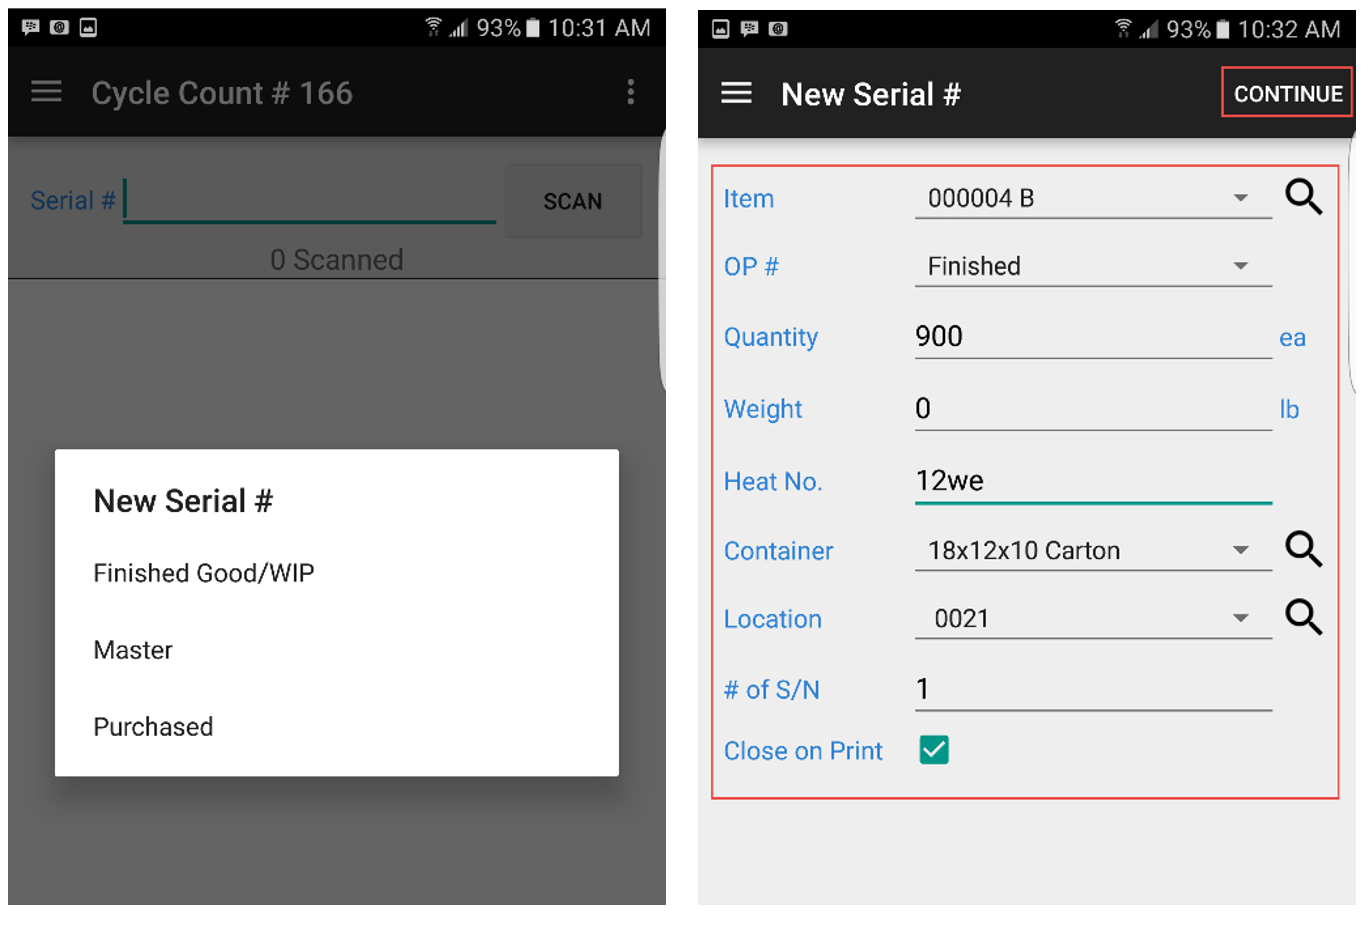
Complete all of the required information, and make sure to select the correct Operation from the drop-down menu. Once you have chosen the Item, some of the information will default based on information on the Manufacture Routings screen. Users can create more than one Serial Number at a time if necessary, if all of the information is the same (same Heat, Quantity, etc.). If more than one Serial Number is being created, make sure to change the # of S/N amount is changed to the appropriate number.
Select the Close on Print checkbox to print the Barcode Label for the Finished Good/WIP, and select the Continue option located at the top right side of the screen. Select the appropriate printing properties and touch OK to print. The system will notify you when the Barcode Label has been created successfully.
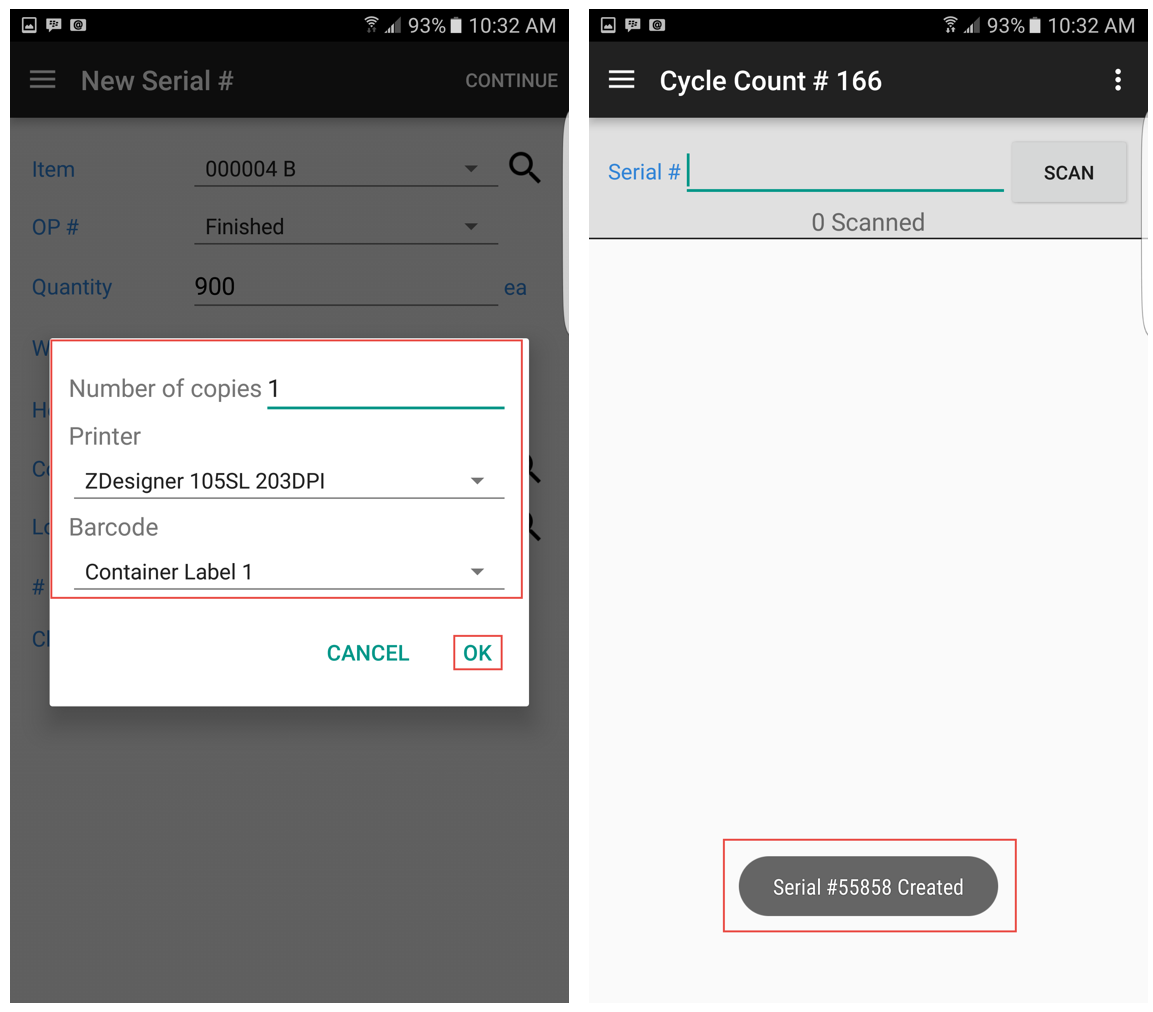
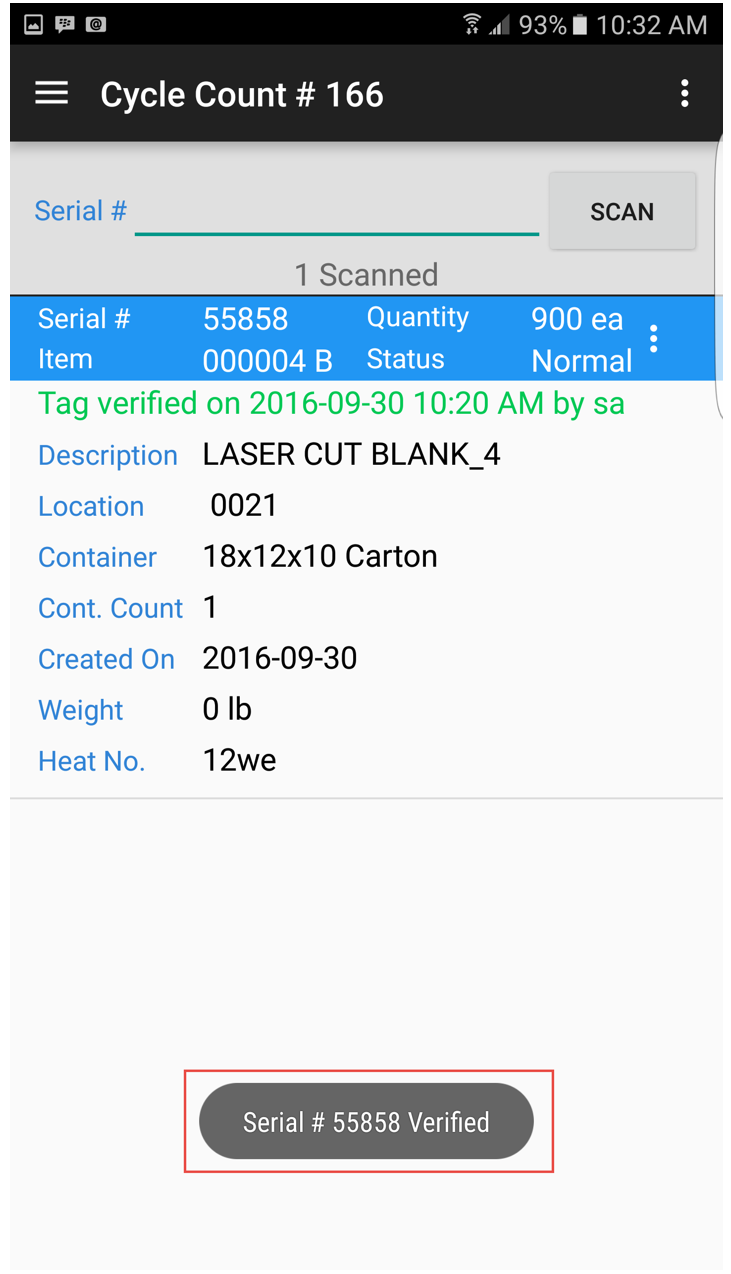
You must scan the Barcode Label so it is included and verified as part of the Cycle Count. Touch the SCAN button, hold the trigger of your scanning device, or enter in the Serial #. The system will populate a message to verify that the Serial Number is included in the Cycle Count.
Fork-lift Terminal
To create a Tag for a Manufactured Item using the Fork-lift Terminal, simply open the Scan window. From the main menu, click on the  button. Users
also have the ability to click on the
  button from any other location on the Fork-lift Terminal Application.
Then, click on the |images/cyclecounts/newproductiontag-2.jpg| button. The new Production Tag window will appear.
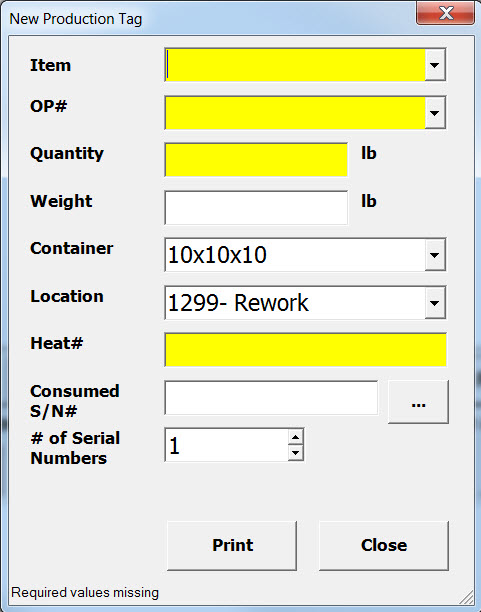
All required fields are highlighted in yellow. Once all of the required fields are entered, click on the  button.
A window will appear prompting users to print a Barcode Label. Users must verify the number of copies to print as well as the Printer.
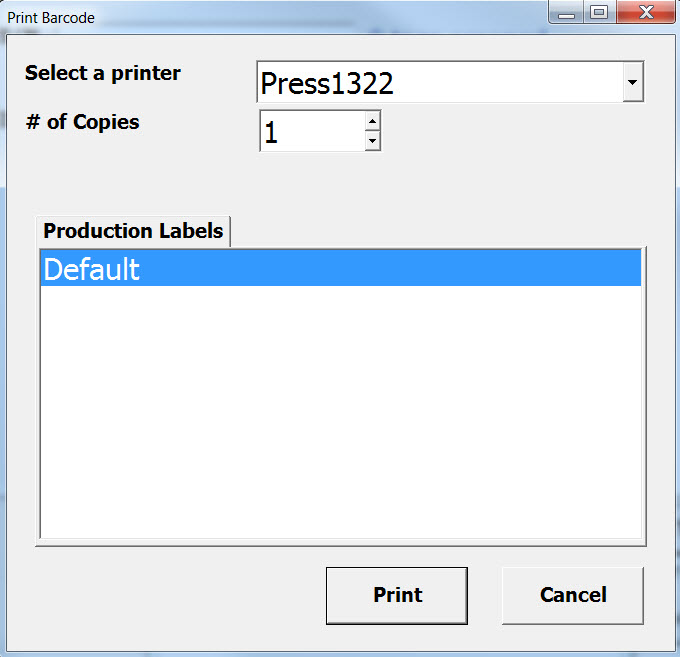
Then, click on the  button to print the Barcode Label. If users wish to cancel, they may do so. The printing will be canceled but the Tag will still be created.
A message will appear, indicating that the Tag was created successfully.
Handheld Scanner
To create a Tag for a Manufactured Item using the Handheld Scanner, simply open the Scan window. From the main menu, click on the  button.
Click on the  button. The Create New S/N screen will appear where users must click on the
  button.
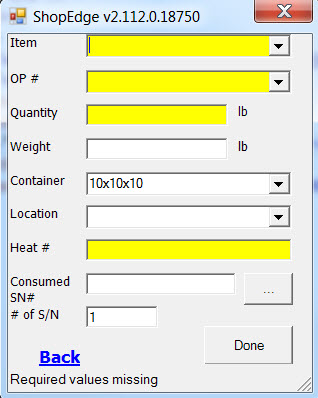
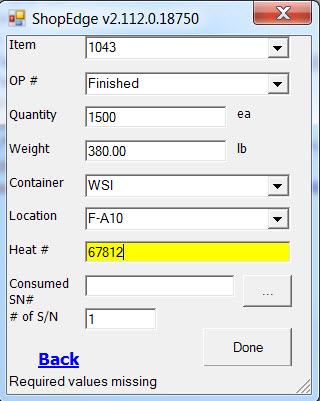
All required fields are highlighted in yellow. Once all of the values are entered in, click on the  button.
A window will appear, prompting users to print a Barcode Label. Users must verify the number of copies to be printed as well as the Printer and Printer settings.

Click on the  button to print the Barcode Label.
Note
Clicking on the Cancel button will only stop the Barcode from printing. The Tag will still be created.
A message will display indicating that the Tag was created successfully.
Auditing a Cycle Count in Progress
Depending on a user’s requirements, they may choose to process a Cycle Count on a Location-by-Location or Item-by-Item basis. During this process, users should audit what is being scanned and what has not been scanned. The Physical Inventory report can be used to track Inventory progress.
To access the Physical Inventory report, navigate to the  tab and click on the
 ![]() icon. Then, double-click on
the report titled Physical Inventory in Progress.
icon. Then, double-click on
the report titled Physical Inventory in Progress.
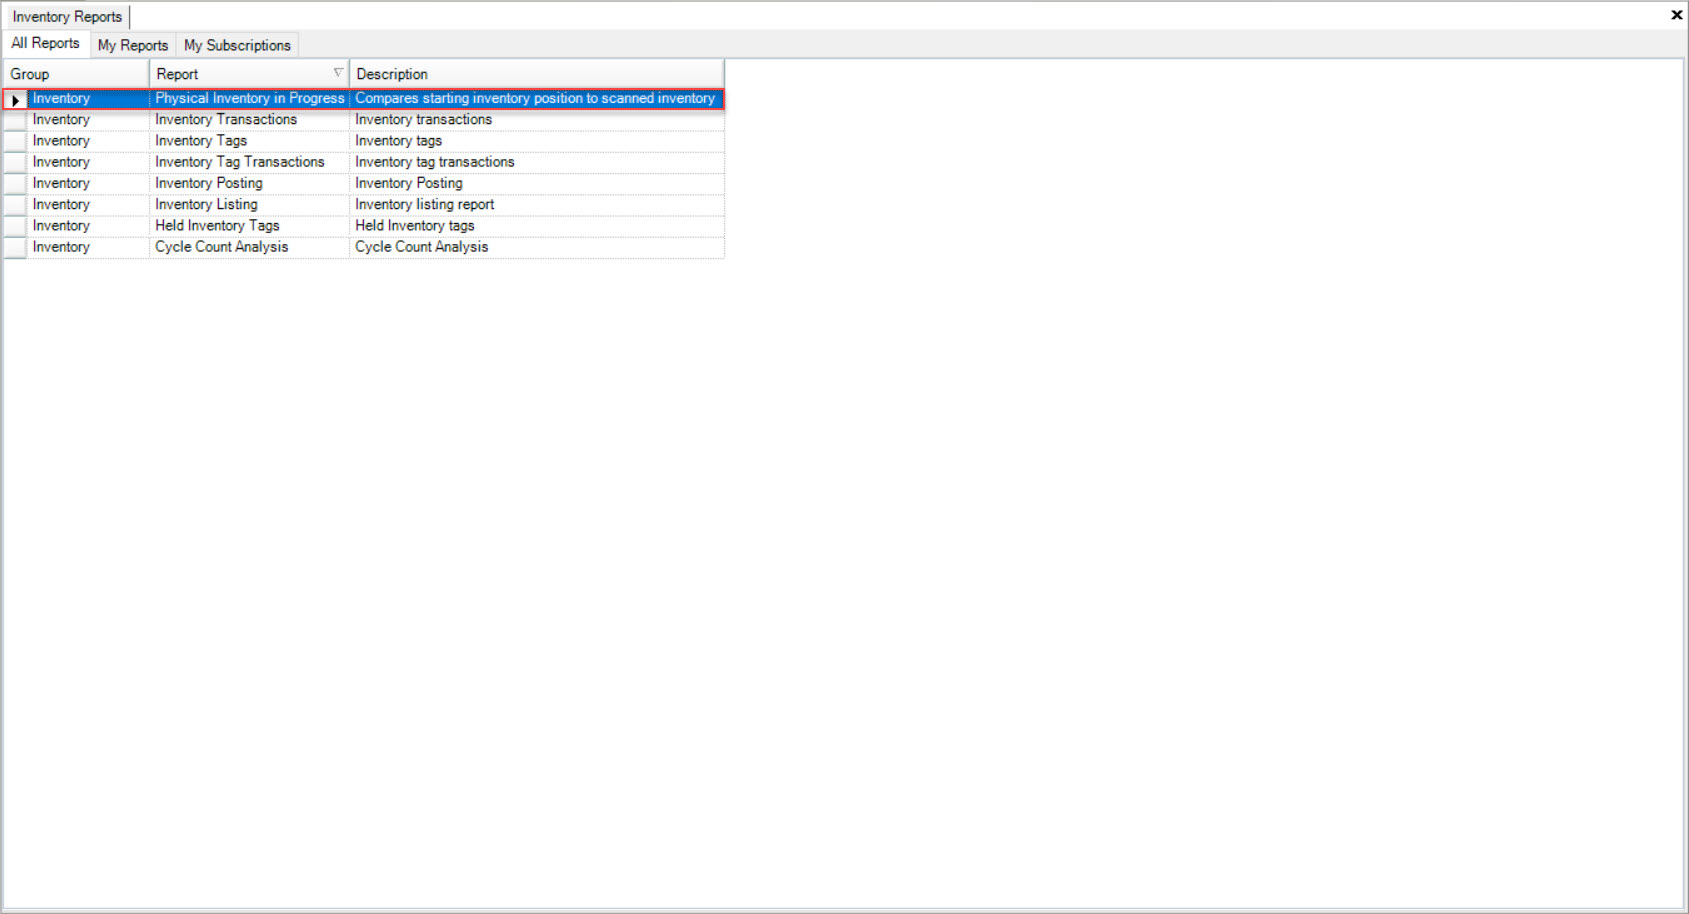
The Physical Inventory in Progress screen will appear. User must select the Cycle Count you wish to view the report for by using the available drop-down menu. Users can also select or enter in
a variety of Parameters that are available on the screen. Once the necessary information is entered, click on the  button.
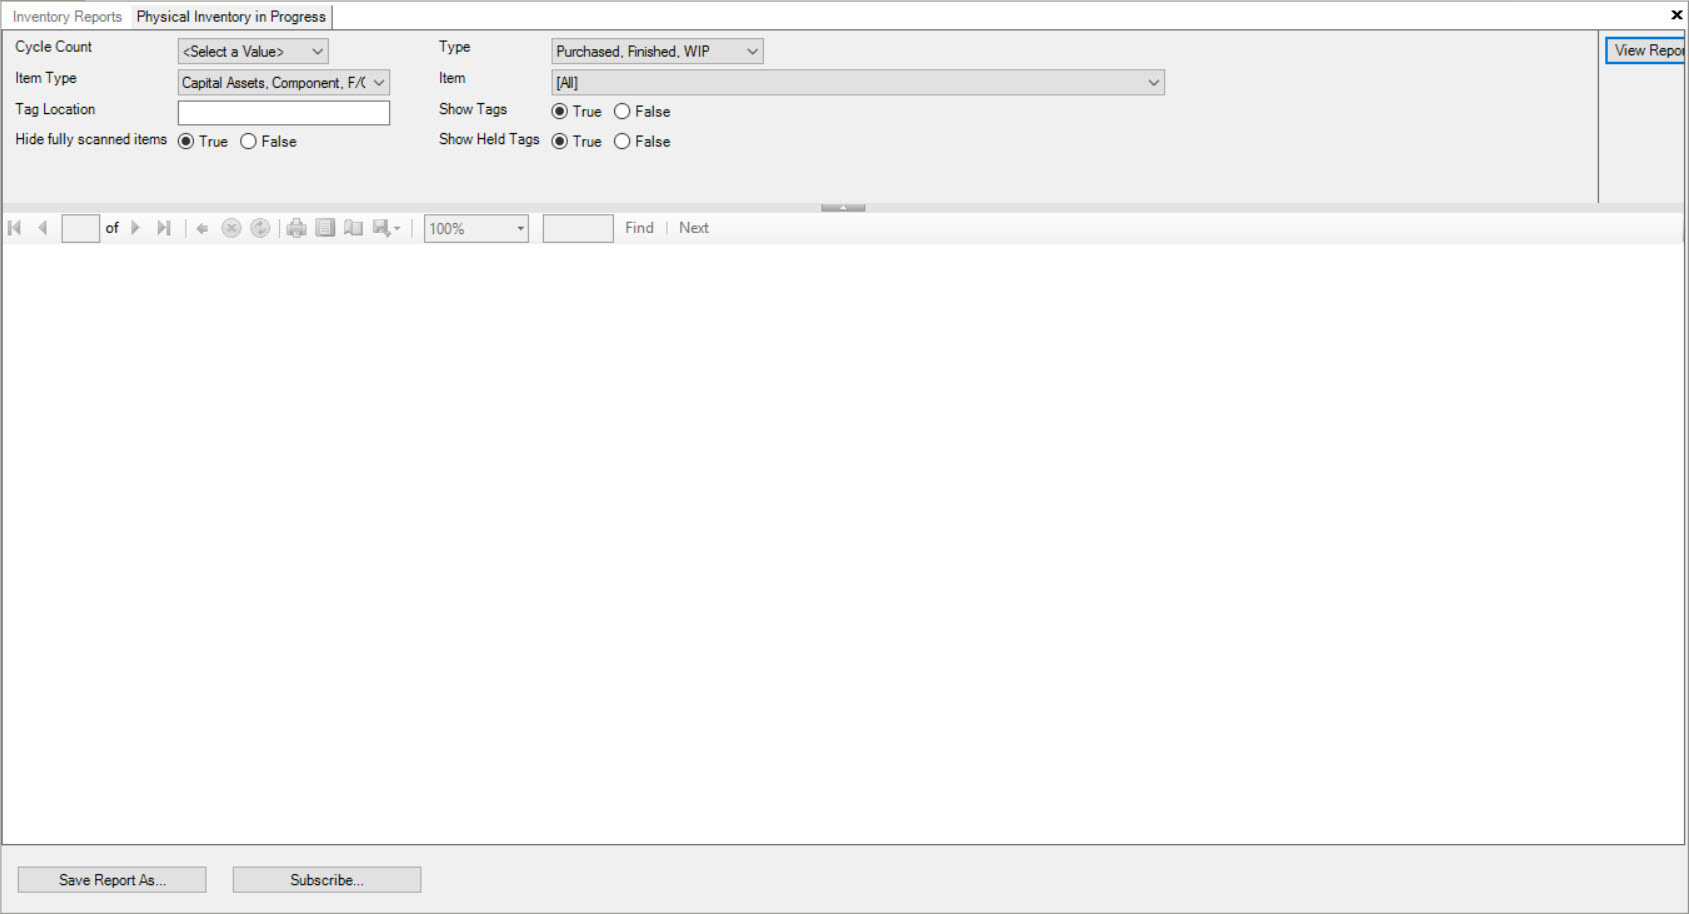

- Type - This filter allows you to select from Purchased, Finished and WIP Tags to view on the report, or you can view all.
- Item Type - Users can view any Item Types in the system, both Manufactured and Purchased. Examples include Components, MRO Items, and Raw Material.
- Item - Users can select one particular Item, or All Items to view on the report.
- Tag Location - If you wish to view one Location on the report, uses can enter the Tag Location name in this field.
- Show Tags - If True is selected, the Serial #, Status, Location and Quantity of each Tag will show on the report. If False, no Tag information will show.
- Hide Fully Scanned Items - If True is selected, Items with the Scanned Quantity matching the Total Quantity will not show on the report. If False is selected, all Items will show on the report.
- Show Held Tags - If True is selected, Items with Held Tags will show on the report. If False is selected, no Held Tags will show on the report.
Tags that have been scanned as part of the Inventory will have the Scanned Quantity field populated with the Quantity scanned and Scanned displayed. Un-scanned Tags will be displayed without the Scanned Quantity and Scanned fields.
Adding and Removing an Item from a Cycle Count in Progress
Users have the ability to add an Item to a Cycle Count that is in Progress. Users must first navigate to the  tab and click on the
![]() icon. The Cycle Counts screen will be displayed.
icon. The Cycle Counts screen will be displayed.

Users must select a Warehouse using the available drop-down menu. Then, click on the  tab to view the Cycle Counts and Physical Inventory Counts
that are In Progress. The system will populate them according to the Warehouse selected.

Note
Users can view a Cycle Count in Progress by right-clicking on the appropriate row. A menu will appear where users can select the View option. The Cycle Count in Progress window will appear.
Open the Cycle Count by Item that you wish to add another Item to. Click on the  button. The Start Cycle Count window will appear.

Note
Only Items that are not currently part of a Cycle Count will be available and displayed for selection. One Item cannot be part of two Cycle Counts.
Click the Manufactured Items, WIP, and Purchased Items checkboxes to display the individual Item Types. Then, click on the plus sign beside each Item Type to view the Items. Select the appropriate Items
and click on the  button.
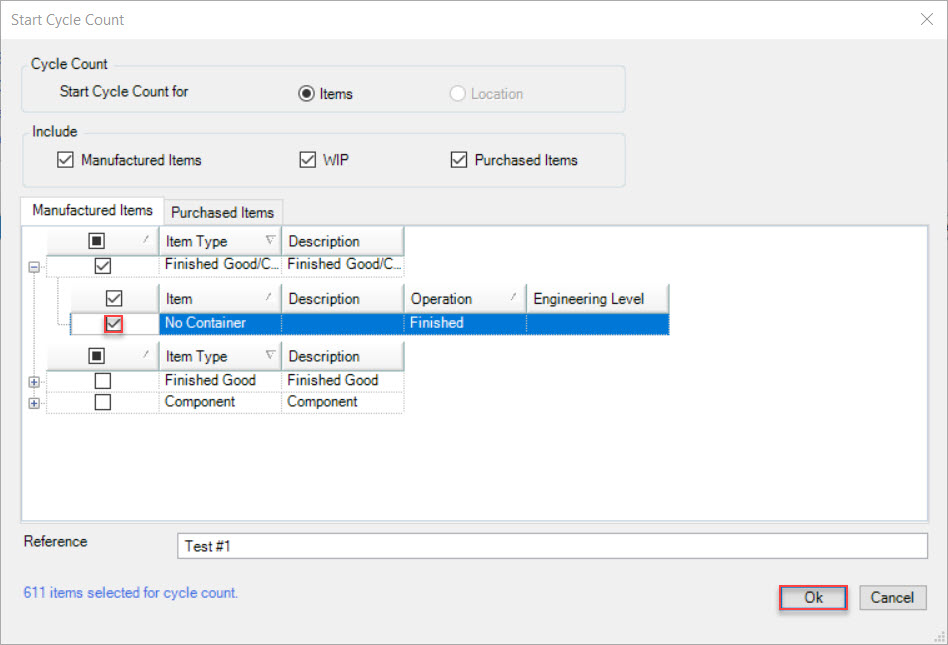
ShopEdge will then take a screenshot of all current Inventory for the Items to be included as part of the Cycle Count which can be used to compare before and after Inventory.
To delete an Item from a Cycle Count, simply highlight the row of the Item you wish to delete. Then, click on the  button.
A Confirm Remove window will appear where users must click on the  button to confirm.
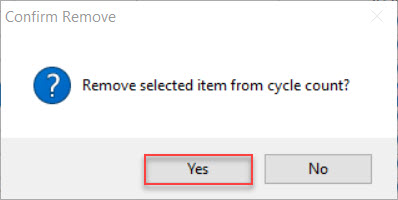
The highlighted Item will be removed from the Cycle Count.
Adding and Removing a Location from a Cycle Count in Progress
Users have the ability to add a Location to a Cycle Count that is in Progress. Users must first navigate to the  tab and click on the
![]() icon. The Cycle Counts screen will be displayed.
icon. The Cycle Counts screen will be displayed.

Users must select a Warehouse using the available drop-down menu. Then, click on the  tab to view the Cycle Counts and Physical Inventory Counts
that are In Progress. The system will populate them according to the Warehouse selected.

Note
Users can view a Cycle Count in Progress by right-clicking on the appropriate row. A menu will appear where users can select the View option. The Cycle Count in Progress window will appear.
Open the Cycle Count by Location that you wish to add another Location to. Click on the  button. The Start Cycle Count window will appear.

Note
Only Locations that are not currently part of a Cycle Count will be available and displayed for selection. One Location cannot be part of two Cycle Counts.
Use the different tabs to select the appropriate Location. Then, click on the  button.
ShopEdge will then take a screenshot of all current Inventory for the Locations to be included as part of the Cycle Count which can be used to compare before and after Inventory.
To delete a Location from a Cycle Count, simply highlight the row of the Location you wish to delete. Then, click on the  button.
A Confirm Remove window will appear where users must click on the  button to confirm.
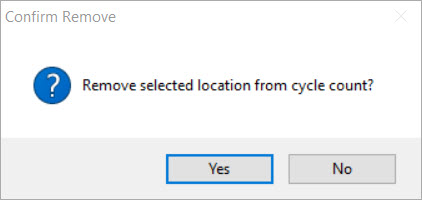
The highlighted Location will be removed from the Cycle Count.
Completing a Cycle Count
Once all of the Tags have been scanned and the Cycle Count has been audited using the Physical Inventory report, users will need to end the Cycle Count. Ending a Cycle Count will make the system take an after-Inventory screenshot so Inventory Adjustments can be made.
To end (complete) a Cycle Count, navigate to the  tab and click on the
 ![]() icon. The Cycle Counts screen will be
displayed.
icon. The Cycle Counts screen will be
displayed.

Users must select a Warehouse using the available drop-down menu. Then, click on the  tab to view the Cycle Counts
that are In Progress. The system will populate them according to the Warehouse selected.

Open the Cycle Count that you wish to complete either by Item or Location. Click on the  button. The Complete Cycle Count window will appear where users
must review the unverified Tags and then click on the
  button.
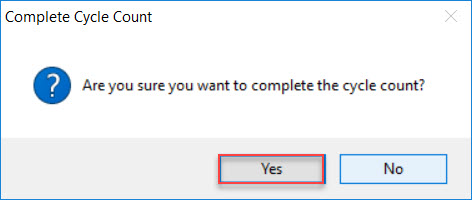
A window will appear where users must click on the  button to confirm.
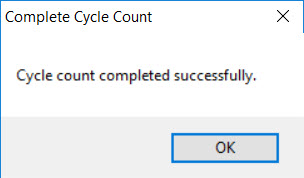
Another window will appear to confirm that the Cycle Count has been completed successfully.
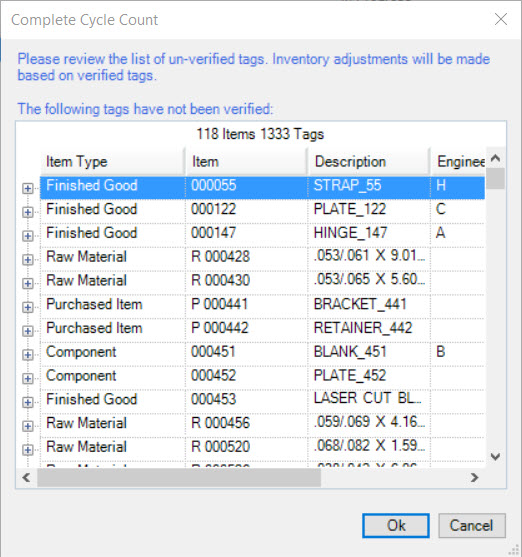
If there are Items that have not been completely scanned, the system will display a list of all of the unverified Tags. Inventory adjustments will be made for these Items, and all of the unscanned Tags will be deleted. Once you have verified that you are okay with the information provided by the ysstem, click the OK button.
The Cycle Count will be cleared from the screen and completed.
Note
Ending (completing) a Cycle Count can be a lengthy process since the system screenshot, and potentially a large number of Inventory Adjustments can be made.
Once the Cycle Count is completed, it will be moved to the  tab for record that it has been completed.
Another way that users may choose to complete a Cycle Count would be by right-clicking on the appropriate row of the Cycle Count you wish to complete. A menu will appear where users can select the Complete option.
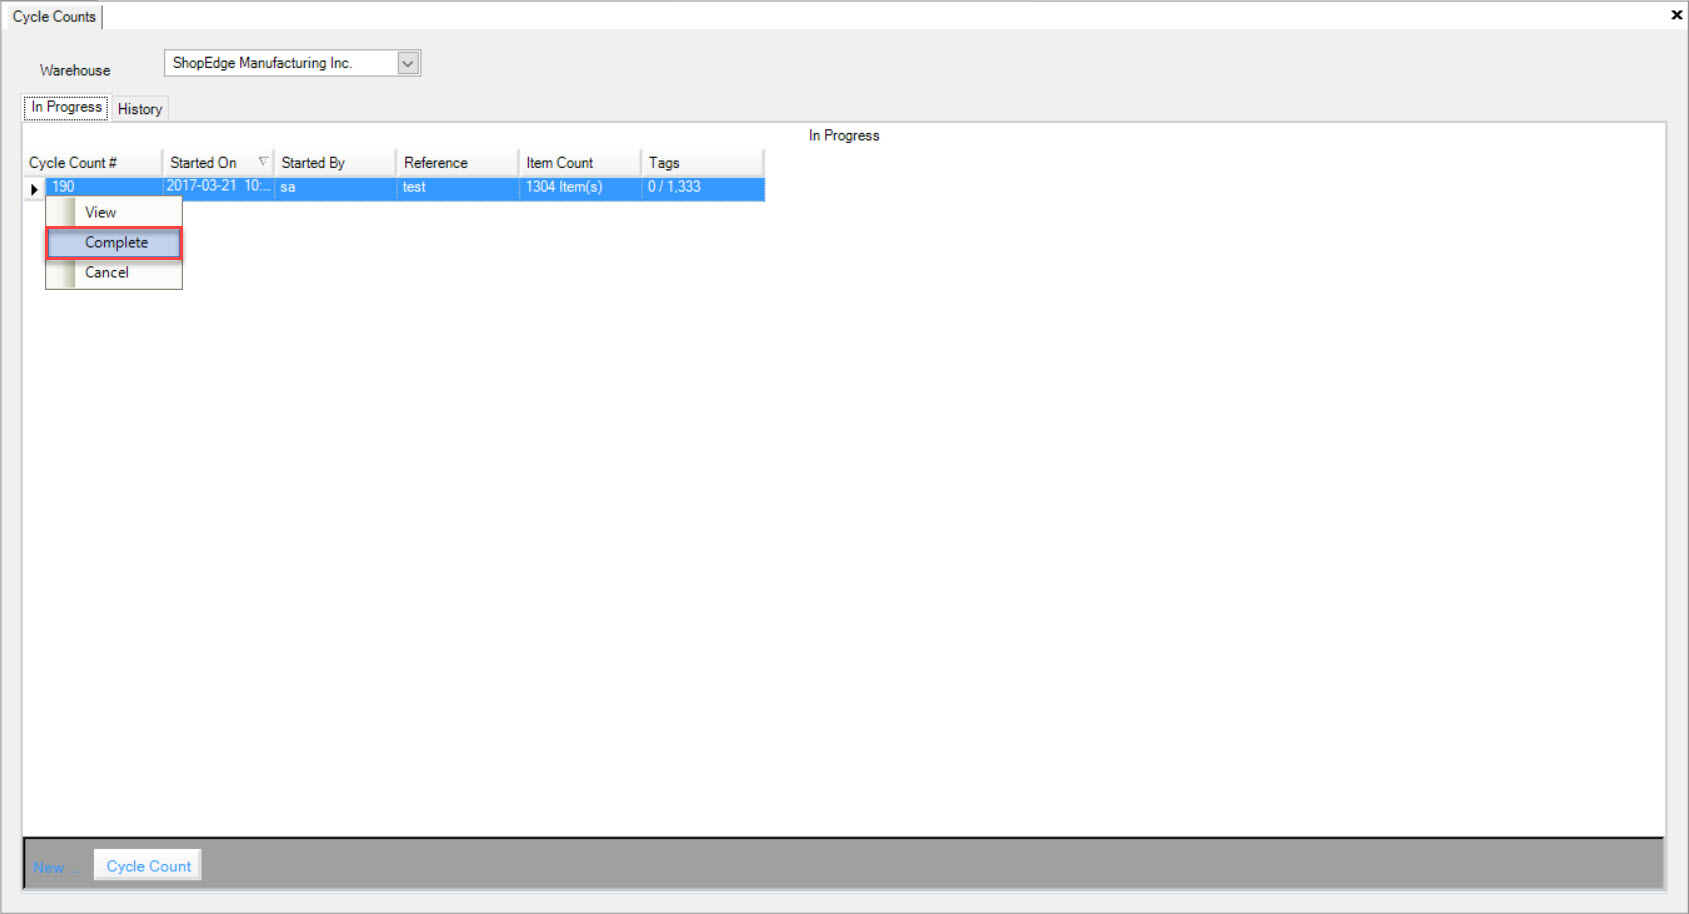
The Complete Cycle Count window will appear where users must review the unverified Tags. Users must then click on the  button to confirm.

A window will appear where users must click on the  button to confirm.

Another window will appear to confirm that the Cycle Count has been completed successfully.

Inventory Adjustments
When a Cycle Count is completed, Inventory Adjustments are made automatically. Theoretical or Production Inventory values are adjusted to match the scanned Tag totals, and un-scanned Tags are deleted from Inventory.
Inventory Adjustments are made for both Good and Held Inventory. No Inventory Adjustments are made for Inventory at a Processor.
The picture below shows the Inventory at the start of a Cycle Count.
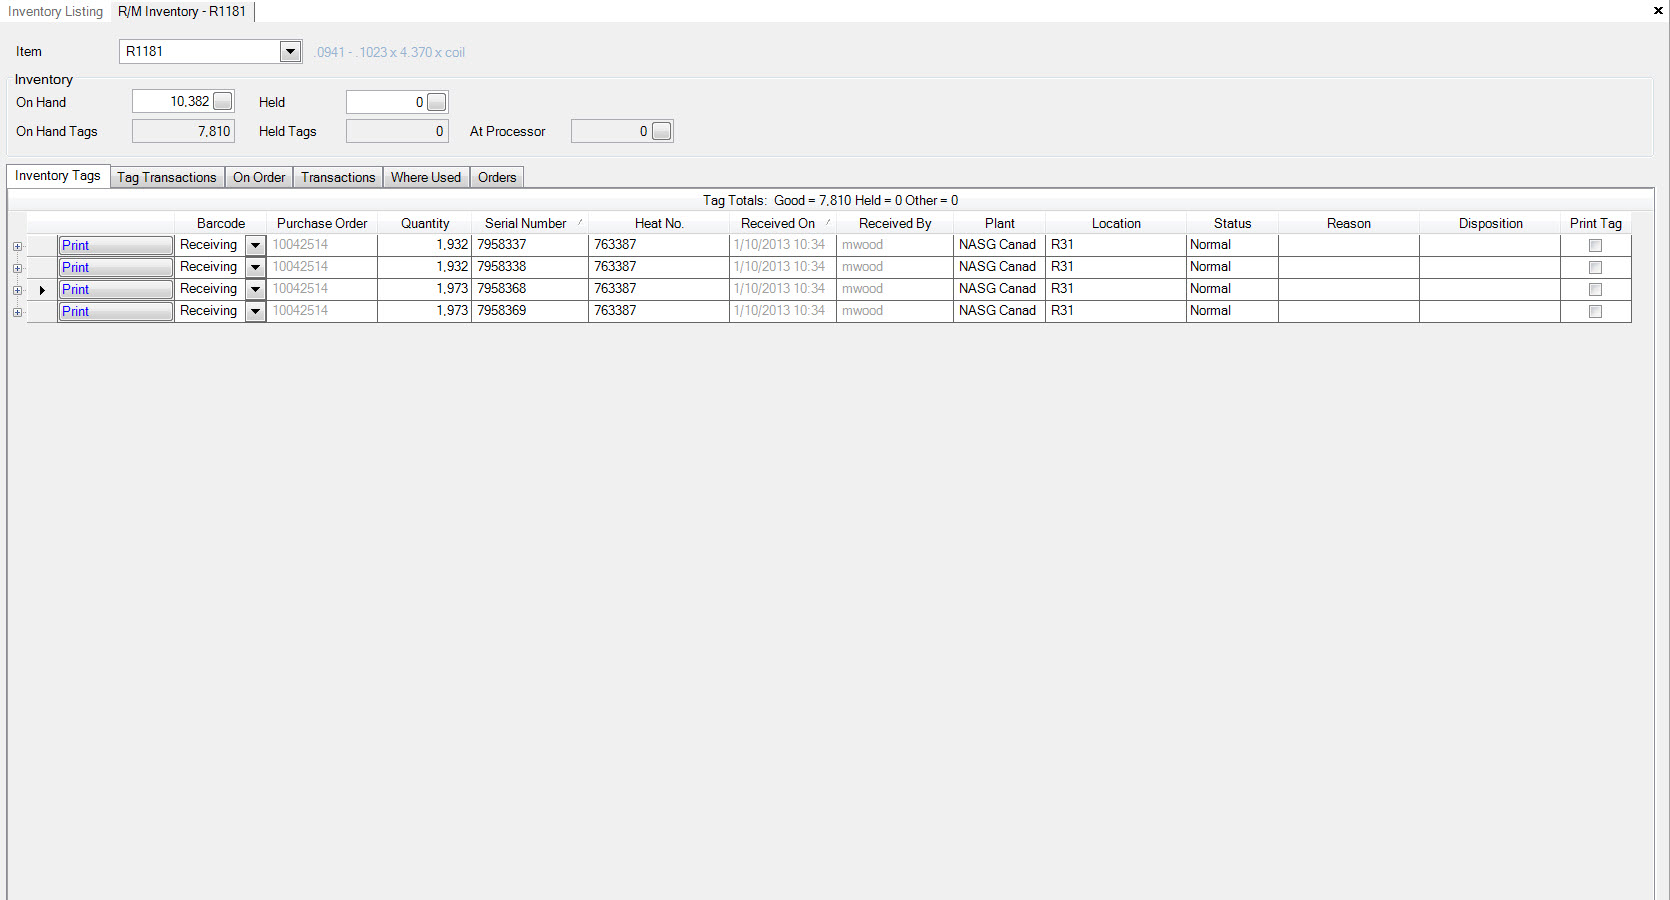
The following pictures show the Inventory Adjustments made after the completion of a Cycle Count.


Canceling a Cycle Count
Users have the ability to cancel a Cycle Count instead of completing it. To do so, navigate to the  tab and click on the
![]() icon. The Cycle Counts screen will be displayed.
icon. The Cycle Counts screen will be displayed.

Users must select a Warehouse using the available drop-down menu. Then, click on the  tab to view the Cycle Counts and Physical Inventory Counts
that are In Progress. The system will populate them according to the Warehouse selected.

Open the Cycle Count that you wish to cancel either by Item or Location. Click on the  button. The Confirm Cancel window will appear where users must
select the
  button to confirm.
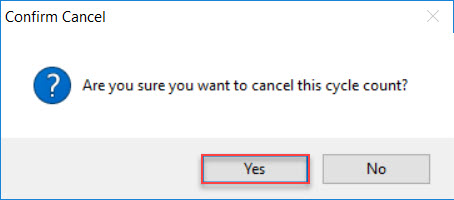
The Cycle Count will be canceled and removed from the screen.
Another way users may choose to cancel a Cycle Count would be to right-click on the appropriate row of the Cycle Count you wish to cancel. A menu will appear where users can select the **Cancel option.
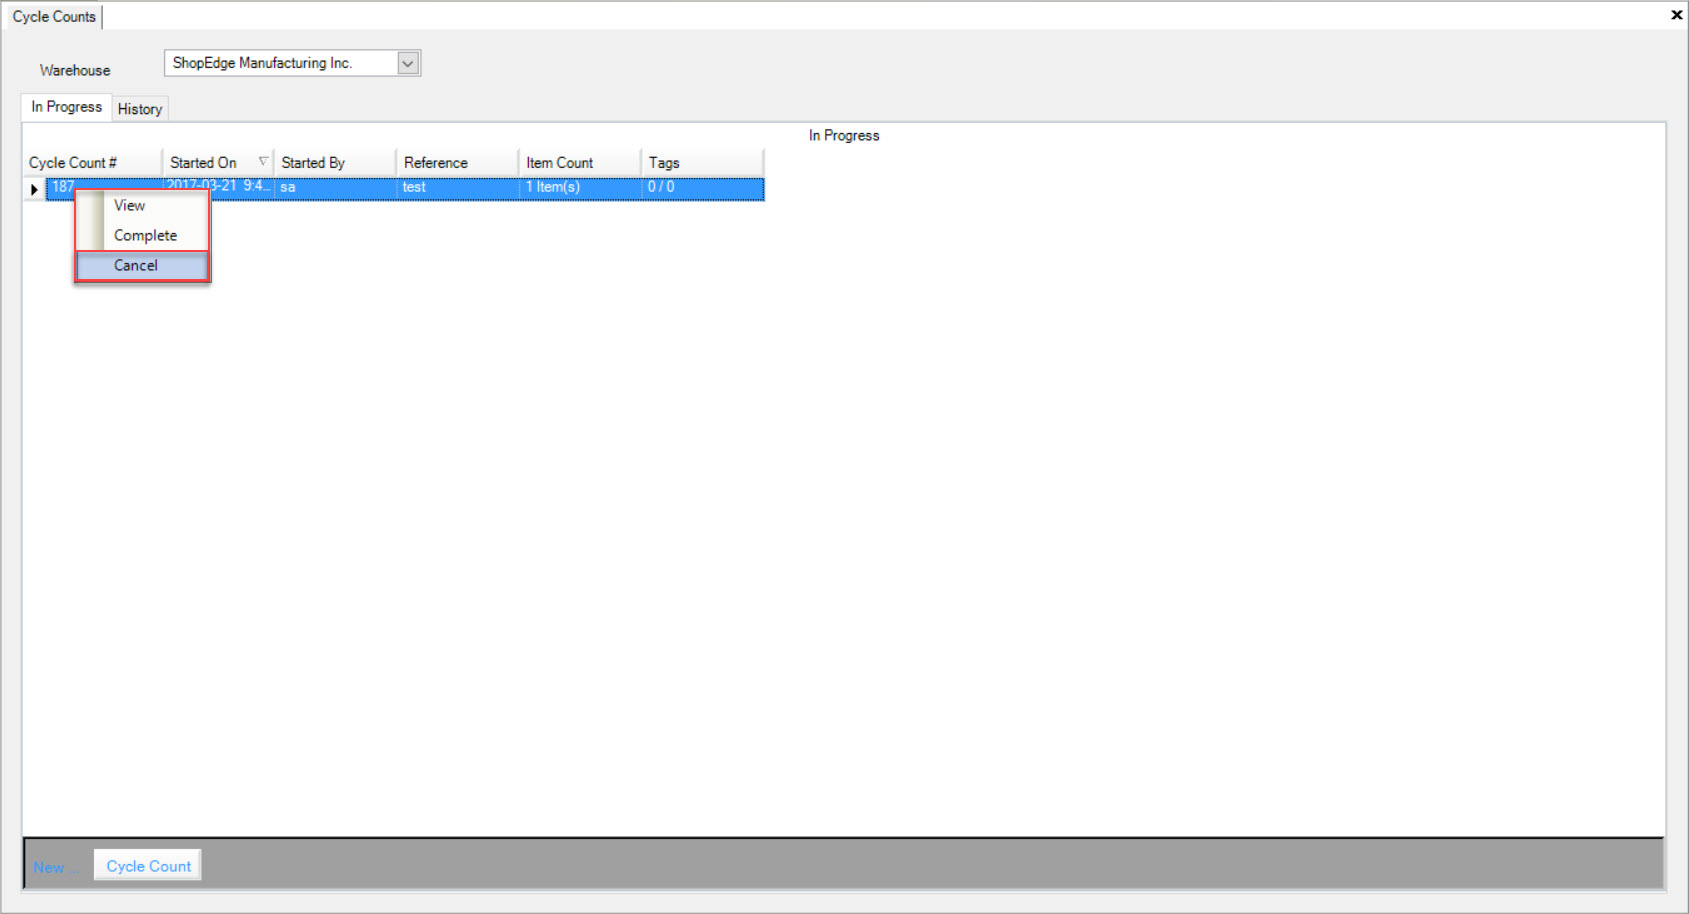
The Confirm Cancel window will appear where users must select the  button to confirm.

The Cycle Count will be canceled and removed from the screen.